
Choose a different version or distribution
Introduction
Before, we begin talking about steps to set up SSH Keys on CentOS 7, first, let's understand- What is SSH?
The Secure Shell (SSH) is mainly a cryptographic network protocol. It is useful for a secure connection between a client and a server.
The two most popular, SSH authentication protocols that you should be aware of are as follows:
- Password-based Authentication
- Public-Key based Authentication
It is more convenient and secure to use SSH keys instead of traditional password authentication.
In this tutorial, you will set up SSH Keys on CentOS 7. We will also address a few FAQs related to how to set up SSH Keys on CentOS 7.
Advantages of SSH
- Secure Remote Access: SSH provides a secure method for remotely accessing and managing systems, protecting data transmission from unauthorized access.
- Encryption: SSH encrypts data, ensuring confidentiality and integrity during remote sessions, making it difficult for hackers to intercept and tamper with information.
- Authentication: SSH supports multiple authentication methods, including passwords, public key authentication, and two-factor authentication, enhancing security and preventing unauthorized access.
- Port Forwarding: SSH allows for secure tunneling and port forwarding, enabling access to remote services securely over untrusted networks.
- Cross-Platform Compatibility: SSH is available on a wide range of operating systems and devices, making it highly versatile and widely adopted in managing remote systems.
Step 1 - Creating SSH keys on the CentOS
1) Before, you start generating a new SSH key pair, first check if there are any existing SSH keys on your CentOS client machine. To check that run the below command:
ls -l ~/.ssh/id_*.pub
If the output of command gives output like No such file or directory or no matches found then it means that you don't have any existing SSH key pair, and you can start creating the new one.
If you get any positive results then either you can use the old key or take a backup of your old keys and generate the new one.
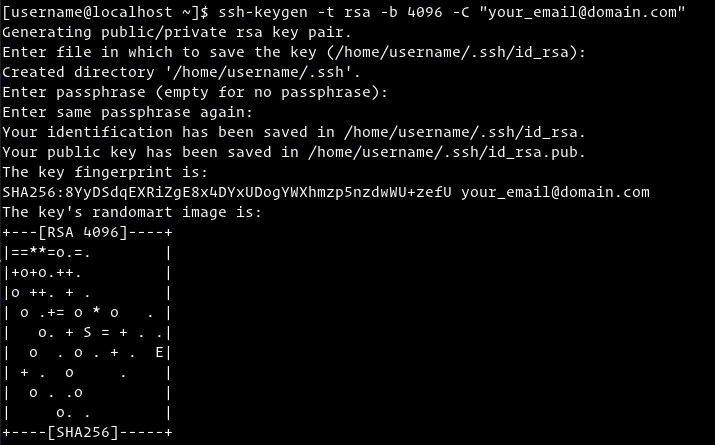
2) Next, start by generating new 4096 bits SSH key pair with your email address as a comment:
ssh-keygen -t rsa -b 4096 -C "[email protected]"
You will get a prompt to specify the file name:
Output

Enter file in which to save the key (/home/yourusername/.ssh/id_rsa):
3) To accept the default file name and file location, press Enter.
4) You can get an extra layer of security if you choose to set a passphrase, moreover, it is not mandatory to set a passphrase.
Output

Enter passphrase (empty for no passphrase):
If you have decided not to use a passphrase, you will get the following output:
To verify if your SSH key pair is generated or not use the following command:
ls ~/.ssh/id_*
Output

/home/yourusername/.ssh/id_rsa /home/yourusername/.ssh/id_rsa.pub
Step 2 - Copy Public Key to the CentOS Server
1) Once the SSH key pair is generated, you can copy the key to the server that you want to manage.
You can copy the key using ssh-copy-id:
ssh-copy-id remote_username@server_ip_address
After that, you will get a prompt to enter remote_username password:
Output

remote_username@server_ip_address's password:
2) Once the user is authenticated after entering the password, the public key ~/.ssh/id_rsa.pub will get appended to the remote user ~/.ssh/authorized_keys file, after that the connection will be closed.
Output

Number of key(s) added: 1

Now try logging into the machine, with:   "ssh 'username@server_ip_address'"
and check to make sure that only the key(s) you wanted were added.
3) Next, if the ssh-copy-id utility is not available on your local computer then you need to use the following command:
cat ~/.ssh/id_rsa.pub | ssh remote_username@server_ip_address "mkdir -p ~/.ssh && chmod 700 ~/.ssh && cat >> ~/.ssh/authorized_keys && chmod 600 ~/.ssh/authorized_keys"
Step 3 - Login to your server using the SSH keys
1) Now, you can log in to the remote server without getting a prompt for a password. To verify it, login to your server via SSH:
ssh remote_username@server_ip_address
If you have not set a passphrase for the private key you will get logged in immediately. Otherwise, you will get a prompt to enter the passphrase.
Step 4 - Disabling the SSH Password Authentication
An additional layer of security can be added by disabling the SSH password authentication. Make sure you can log in to your server as a sudo user without a password.
1) To disable the SSH Password Authentication, you need to first log into your remote server using the following command:
ssh sudo_user@server_ip_address
2) After that, open the SSH configuration file /etc/ssh/sshd_config with text editor:
sudo nano /etc/ssh/sshd_config
3) Search for the below directives and modify it as follows:
                               /etc/ssh/sshd_config
PasswordAuthentication no
ChallengeResponseAuthentication no
UsePAM no
4) After that, save the file and restart the SSH service using the following command:
sudo systemctl restart ssh
FAQs to Set Up SSH Keys on CentOS 7
Where are SSH keys stored on CentOS 7?
SSH keys are stored in the ~/.ssh directory in the user's home directory on CentOS 7. The public key is usually named id_rsa.pub, and the private key is named id_rsa.
How do I copy my public key to the server?
Use the ssh-copy-id command to copy your public key to the server. For example, ssh-copy-id username@server_ip will copy your public key to the specified user's authorized_keys file on the server.
Can I use an existing SSH key pair on CentOS 7?
Yes, you can use an existing SSH key pair on CentOS 7. Simply copy your public key (.pub file) to the ~/.ssh directory on the server, and ensure the correct file permissions are set.
How do I disable password authentication and only allow SSH key authentication?
To disable password authentication and only allow SSH key authentication, edit the SSH server's configuration file (/etc/ssh/sshd_config) and set PasswordAuthentication to no. Restart the SSH service for the changes to take effect.
How do I troubleshoot SSH key authentication issues?
Check the permissions on the ~/.ssh directory (700) and the authorized_keys file (600) on both the client and server. Also, verify that the correct public key is added to the authorized_keys file on the server.
Can I use passphrase-protected SSH keys on CentOS 7?
Yes, you can use passphrase-protected SSH keys on CentOS 7. When generating the keys, simply provide a passphrase when prompted. However, keep in mind that you will need to enter the passphrase each time you use the key.
How do I disable SSH key authentication temporarily?
To temporarily disable SSH key authentication, add the -o PreferredAuthentications=password option when connecting to the server using SSH. This will prioritize password-based authentication instead of keys.
Conclusion
We hope this detailed guide helped you to set up SSH Keys on CentOS 7.
If you have any queries, please leave a comment below and we’ll be happy to respond to them for sure.