
Choose a different version or distribution
Introduction
Before we begin talking about how to install phpMyAdmin with apache on a CentOS 7 Server, let's briefly understand – What is phpMyAdmin?
The phpMyAdmin is a popular web-based database management tool for MySQL and MariaDB. It allows you to manage your databases, tables, and execute SQL queries through a user-friendly web interface.
This tutorial will guide you through the process of installing phpMyAdmin with Apache on a CentOS 7 server. We will also address a few FAQs on how to Install phpMyAdmin with Apache on a CentOS 7.
Advantages of Installing phpMyAdmin with Apache on CentOS 7
- User-Friendly Interface: phpMyAdmin provides a user-friendly web interface, making it easy to manage and manipulate databases, tables, and data without the need for complex SQL queries.
- Convenient Database Management: With phpMyAdmin, you can perform various database management tasks, including creating and modifying databases, tables, and user accounts.
- Efficient Query Execution: phpMyAdmin allows you to execute SQL queries directly from its interface, making it convenient and efficient for database administration.
- Security and Access Control: By securing phpMyAdmin with authentication and SSL/TLS encryption, you can ensure that only authorized users have access to the database management tool, enhancing the security of your data.
- Flexibility and Compatibility: phpMyAdmin is compatible with both MySQL and MariaDB, providing flexibility in managing different database systems.
Prerequisites
There are a few conditions that must be met before we can start.
Set up a non-root user with sudo access for administrative commands, among other things.
Installing a LAMP stack on your CentOS 7 server, which consists of Linux, Apache, MariaDB, and PHP. This is the framework on which we will run the phpMyAdmin interface (together with MariaDB, the database management system we want to manage).
After following these directions, you should be able to proceed with the rest of this page.
Step 1 — Install phpMyAdmin
We can start installing the phpMyAdmin software straight immediately since our LAMP platform is already set up. Unfortunately, the default repository for CentOS 7 does not contain phpMyAdmin.
To get the packages we need, we'll have to add another repository to our system. The EPEL repo (Extra Packages for Enterprise Linux) contains a variety of packages, including the phpMyAdmin package that we require.
Your server will be able to access the EPEL repository after installing the epel-release package. Your repository list will be updated as a result, and you'll have access to the EPEL packages.
Install by simply typing:
sudo yum install epel-release
You may use the yum packaging system to install the phpMyAdmin package after setting up the EPEL repo by typing:
sudo yum install phpmyadmin
The installation is now complete. The installation included an already-configured Apache configuration file. We will need to make a few changes to make this operate properly for our installation.
Let's make some adjustments now that the file is open in your text editor:
sudo nano /etc/httpd/conf.d/phpMyAdmin.conf
We can see some directory blocks with some conditional logic inside that explains the directory's access policy. There are two distinct directories created, and within these are settings that will be valid for both Apache 2.2 and Apache 2.4 (which we are running).
This configuration is currently set to restrict access to any connection that is not initiated by the server. We're operating remotely on our server, therefore we need to update a few lines to provide the IP address of your home connection.
You should replace any lines that say Require ip 127.0.0.1 or Allow from 127.0.0.1 with the public IP address of your system from which you will access your server. If you need help finding the IP address of your home connection, look at the following section. The following four places on the file should require modification:
. . .
Require ip your_workstation_IP_address
. . .
Allow from your_workstation_IP_address
. . .
Require ip your_workstation_IP_address
. . .
Allow from your_workstation_IP_address
. . .
Restart the Apache web server once you're done to apply your changes by typing:
sudo systemctl restart httpd.service
Our phpMyAdmin installation is now up and running. Use your web browser to navigate to your server's domain name or public IP address, followed by /phpMyAdmin to enter the interface:
http://server_domain_or_IP/phpMyAdmin
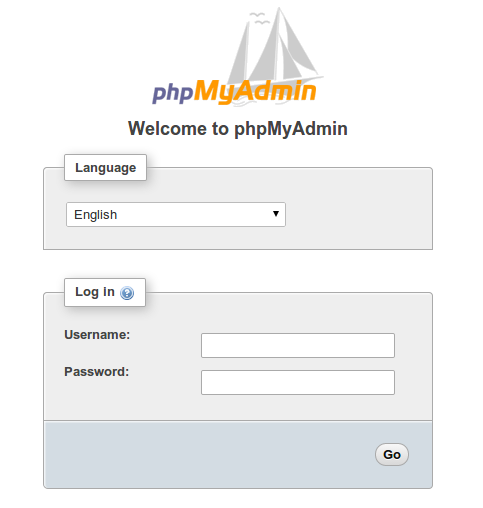
Enter a username and password for an authorized MariaDB user to log in. Starting using the root user and the MariaDB administrative password is a smart idea. After that, the administrative interface will be available to you:
Find Your IP Address
To finish the previous step, you must be aware of the IP address of the computer you are using to access your databases. This is a safety measure to prevent unauthorized users from connecting to your server.
Note: This is the IP address of your home or office computer, not the IP address of your VPS.
Visit one of these websites on your web browser to learn how the wider web perceives your IP address:
Check a few different websites to see if they all provide the same value. In the configuration file mentioned above, use this value.
Step 2 — Secure your phpMyAdmin Instance
The phpMyAdmin instance that was set up on our server ought to be working properly at this point. However, by including a web interface, we have opened up our MySQL system to the whole public.
Even with the built-in login screen, this is a serious problem. Because phpMyAdmin is widely used and gives access to a large amount of data, installations like this are frequently targets for attackers.
We'll use two simple methods to reduce the likelihood that our installation will be attacked and compromised. We are going to transfer the interface from /phpMyAdmin to another site to prevent some automated bot brute-force attacks. We'll also construct a second authentication gateway at the web server level that must be passed in order to access the phpMyAdmin login page.
Changing the Application’s Access Location
Our Apache web server's phpMyAdmin configuration file uses an alias to redirect to the files' directory location in order for phpMyAdmin to work.
To alter the URL where users may access our phpMyAdmin interface, we simply need to rename the alias. Open the phpMyAdmin Apache configuration file by going to:
sudo nano /etc/httpd/conf.d/phpMyAdmin.conf
The file will have two lines at the top that look like this:
Alias /phpMyAdmin /usr/share/phpMyAdmin
Alias /phpmyadmin /usr/share/phpMyAdmin
These two lines serve as our aliases, which means that whenever someone accesses our website using its domain name or IP address followed by either /phpMyAdmin or /phpmyadmin, they will be presented with the information located at /usr/share/phpMyAdmin.
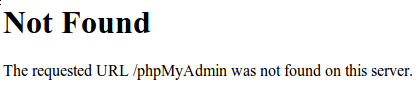
We want to disable them as a result of the fact that dangerous users and bots routinely target specific aliases. Instead, we ought to pick our own nom de plume. Simple to remember, but difficult to guess, should be the objective. It shouldn't specify the purpose of the URL site. We'll employ /nothingtosee in this situation.
To implement the changes we want, we should remove or comment out the existing lines and add our own:
Alias /phpMyAdmin /usr/share/phpMyAdmin
Alias /phpmyadmin /usr/share/phpMyAdmin
Alias /nothingtosee /usr/share/phpMyAdmin
After saving your work, close the file.
To apply the modifications, restart the web service:
sudo systemctl restart httpd.service
Now, a 404 error will appear if you visit the previous location of your phpMyAdmin installation:
http://server_domain_or_IP/phpMyAdmin
The new website we selected will now house your phpMyAdmin interface, though:
http://server_domain_or_IP/nothingtosee

Setting up a Web Server Authentication Gate
The next function we required for our setup was a phpMyAdmin login page that wouldn't be accessible until a user had successfully completed an authentication check.
Thankfully, this feature is available by default on the majority of web servers, including Apache. We may use an authorization file by only altering the configuration of our Apache server.
Reopen the text editor and the Apache configuration file for phpMyAdmin:
sudo nano /etc/httpd/conf.d/phpMyAdmin.conf
Every block inside the /usr/share/phpMyAdmin directory block has to have an override directive added to it.
. . .
<Directory /usr/share/phpMyAdmin/>
   AllowOverride All
   <IfModule mod_authz_core.c>
   . . .
</Directory>
. . .
As a result, we will be able to add additional configuration data to a file called .htaccess that is located inside the phpMyAdmin directory. Our password authentication will be configured using this file.
Save your work, then close the document.
Restart the web service to take effect of this update:
sudo systemctl restart httpd.service
Create an. htaccess File
Since we have included the override directive in our setup, Apache will now search the /usr/share/phpMyAdmin directory for a file with the name .htaccess. If so, it will update its previous configuration data to include the directives in it.
The next action is to create the .htaccess file in that directory. Use your text editor now to complete the following:
sudo nano /usr/share/phpMyAdmin/.htaccess
The following information must be entered in this file:
AuthType Basic
AuthName "Admin Login"
AuthUserFile /etc/httpd/pma_pass
Require valid-user
Let's explore each of these lines individually:
- AuthType Basic: This line explains the kind of authentication that we are employing. To implement password authentication, this kind will employ a password file.
- AuthName: This configures the authentication dialogue box's message. Keep this general to prevent unauthorized users from learning what is being protected.
- AuthUserFile: The actual password file that will be used for authentication is set here. Outside the directories being provided should be this. In a moment, we'll make this file.
- Require valid-user: This specifies that only users who have supplied legitimate credentials should have access to this resource. This is what actually keeps unauthorized users out.
Once you've finished entering all of this information, save the document.
Create the Password File for Authentication
We need to create and populate the password file now that the path has been specified by the AuthUserFile directive in our .htaccess file.
To do this, htpasswd, a utility offered by Apache, can be utilized. When we execute the command, we supply the username for whom we want to add authentication information as well as the location where we want to create the file:
sudo htpasswd -c /etc/httpd/pma_pass username
A file will be created initially, according to the -c flag. The directory's location will dictate the file's path and filename. The username is the initial user that we want to add. The user's password must be entered and verified.
You may run the same command again with a different username and without the -c flag if you wish to add other users to authenticate:
sudo htpasswd /etc/httpd/pma_pass seconduser
After creating our password file and installing an authentication gateway, we now receive the following password prompt whenever someone visits our website:
http://server_domain_or_IP/nothingtosee
Once your credentials have been supplied, the regular phpMyAdmin login page will be shown. This additional layer of protection will help prevent authentication attempts from showing up in your MySQL logs in addition to providing improved security.
FAQs on Installing and Securing phpMyAdmin with Apache on CentOS 7
Is phpMyAdmin compatible with CentOS 7?
Yes, phpMyAdmin is fully compatible with CentOS 7.
What are the system requirements for installing phpMyAdmin on CentOS 7?
To install phpMyAdmin, you need a CentOS 7 server with Apache and MySQL or MariaDB installed and properly configured.
How can I install phpMyAdmin on CentOS 7 using the package manager?
To install phpMyAdmin using the package manager, run the command sudo yum install phpMyAdmin to install the phpMyAdmin package from the official CentOS repositories.
What is the default installation directory for phpMyAdmin on CentOS 7?
The default installation directory for phpMyAdmin on CentOS 7 is /usr/share/phpMyAdmin/.
How can I secure phpMyAdmin with a username and password?
To secure phpMyAdmin, you can create an .htaccess file with authentication directives and configurations for protecting the phpMyAdmin directory. Additionally, setting up SSL/TLS encryption further enhances security.
How do I create an .htpasswd file for authentication?
Use the htpasswd utility to create an .htpasswd file. Run the command sudo htpasswd -c /path/to/your/.htpasswd username and follow the prompts to enter a password.
Can I restrict access to phpMyAdmin based on IP address?
Yes, you can restrict access to phpMyAdmin by adding the following directive to the .htaccess file:
Conclusion
Installing phpMyAdmin with Apache on a CentOS 7 server provides a convenient and secure way to manage MySQL and MariaDB databases.
With its user-friendly interface, efficient query execution, and access control features, phpMyAdmin streamlines the database administration process.
By following the installation and security steps outlined in this tutorial, you can effectively use phpMyAdmin to manage and secure your databases on a CentOS 7 server.