
Introduction
Before we begin talking about how to set up SSH Tunneling (Port Forwarding), let's briefly understand – What is SSH tunneling?
SSH tunneling, also known as SSH port forwarding, is a mechanism for relaying services ports across an encrypted SSH connection between a client and a server system.
SSH forwarding is important for transmitting network data from services that employ an unencrypted protocol, such as VNC or FTP, accessing geo-restricted content, and getting over intermediate firewalls. Essentially, you may forward any TCP port and have the communication tunneled through a secure SSH connection.
SSH port forwarding can be divided into three categories:
- Local Port Forwarding - Sends a connection from the client host to the SSH server host, which is then forwarded to the destination host port.
- Remote Port Forwarding - Forwards a port from the server to the client, then to the destination host port.
- Dynamic Port Forwarding - This command creates a SOCKS proxy server that permits communication over a variety of ports.
In this tutorial, you will set up SSH Tunneling (Port Forwarding). We will also address a few FAQs on how to set up SSH Tunneling (Port Forwarding).
Advantages of SSH tunneling
- Enhanced Security: SSH tunneling encrypts data transmission, safeguarding it from interception and unauthorized access.
- Remote Access: It allows secure remote access to services without exposing them directly to the internet.
- Bypassing Restrictions: Tunneling can bypass network restrictions, enabling access to blocked services and websites.
- Port Forwarding: SSH tunneling enables port forwarding, facilitating local and remote port redirection for efficient communication.
- Data Compression: It can compress data during transmission, enhancing network performance and reducing bandwidth usage.
Local Port Forwarding
Local port forwarding allows you to forward a local (ssh client) port to a remote (ssh server) port, which is subsequently forwarded to a port on the target system.
In this sort of forwarding, the SSH client listens on a certain port and tunnels any connections to that port to the distant SSH server, which then connects to a port on the target system. The remote SSH server or any other machine can be used as the destination machine.
The most common purpose of local port forwarding is to connect to a remote service on an internal network, such as a database or a VNC server.
To create a local port forwarding on Linux, macOS, and other Unix systems, use the -L option with the ssh client:
ssh -L [LOCAL_IP:]LOCAL_PORT:DESTINATION:DESTINATION_PORT [USER@]SSH_SERVER
The following are the options that were used:
[LOCAL IP:]LOCAL_PORT- The IP address and port number of the local machine. The ssh client binds to localhost if LOCAL IP is not specified.DESTINATION:DESTINATION_PORT- The destination machine's IP address or hostname, as well as its port.[USER@]SERVER_IP- IP address and the remote SSH user.
As a LOCAL_PORT, you can use any port number larger than 1024. Ports with a number less than 1024 are considered privileged and can only be used by root. Use the -p [PORT_NUMBER] argument if your SSH server is listening on a port other than 22 (the default).
The SSH server must be able to resolve the target hostname.
Let's imagine you have a MySQL database server on the machine db001.host on an internal (private) network, listening on port 3306 and accessible from the machine pub001.host, and you wish to connect to it with your local machine MySQL client. You can achieve this by using the following command:
ssh -L 3336:db001.host:3306 [email protected]
When you run the command, you'll be requested to input the password for the remote SSH user. You'll be logged into the remote server and the SSH tunnel will be formed once you've entered the credentials. Setting up SSH key-based authentication and connecting to the server without typing a password is also a smart idea.
When you point your local machine database client to 127.0.0.1:3336, the connection is sent to the db001.host:3306 MySQL server via the pub001.host intermediary server.
In a single ssh command, you can forward numerous ports to different locations. If you have another MySQL database server running on db002.host and want to connect to both from your local client, you would run:
ssh -L 3336:db001.host:3306 3337:db002.host:3306 [email protected]
You'd use 127.0.0.1:3337 to connect to the second server.
When the target host is the same as the SSH server, you can use localhost instead of giving the destination host IP or hostname.
Let's say you need to connect to a remote machine through VNC, which is hosted on the same server but isn't accessible from the outside. You'd use the following command:
ssh -L 5901:127.0.0.1:5901 -N -f [email protected]
The -f option tells ssh to run in the background, while -N tells it not to run a remote command. Because the VNC and SSH servers are on the same machine, we're utilizing localhost.
Check your remote SSH server setup and make sure AllowTcpForwarding is not set to no if you're having problems setting up tunneling. Forwarding is enabled by default.
Remote Port Forwarding
The opposite of local port forwarding is remote port forwarding. It allows you to forward a remote (ssh server) port to a local (ssh client) port, which is subsequently forwarded to a port on the destination system.
In this type of forwarding, the SSH server listens on a specific port and tunnels any connections to that port to the local SSH client, which then connects to a port on the destination machine. It doesn't matter if the destination computer is the local or not.
Pass the -R option to the ssh client on Linux, macOS, and other Unix platforms to create remote port forwarding:
ssh -R [REMOTE:]REMOTE_PORT:DESTINATION:DESTINATION_PORT [USER@]SSH_SERVER
The following are the options that were used:
[REMOTE:]REMOTE_PORT- The remote SSH server's IP address and port number. The remote SSH server will bind to all interfaces ifREMOTEis left empty.DESTINATION:DESTINATION_PORT- The destination machine's IP address or hostname, as well as its port.[USER@]SERVER_IP- The remote SSH user and server IP address.
Remote port forwarding is most commonly used to allow someone, from the outside, access to an internal service.
Let's pretend you're working on a web application on your local PC and want to present a preview to a colleague. Because you don't have a public IP, the other developer won't be able to use the app over the Internet.
If you have access to a remote SSH server, you can use the following commands to set up remote port forwarding:
ssh -R 8080:127.0.0.1:3000 -N -f [email protected]
The command above will make the ssh server listen on a port 8080 and tunnel all traffic from that port to a port 3000 on your local system.
Now, your colleague can preview your fantastic application by typing the_ssh_server_ip:8080 into his or her browser.
Make sure GatewayPorts is set to yes in the remote SSH server configuration if you're experiencing problems setting up remote port forwarding.
Dynamic Port Forwarding
You can use dynamic port forwarding to construct a socket on your local (ssh client) machine that functions as a SOCKS proxy server. When a client connects to this port, the connection is routed to a remote (ssh server) system, which then forwards the connection to a dynamic port on the destination machine.
All apps that use the SOCKS proxy will connect to the SSH server in this manner, and the server will redirect all traffic to its intended destination.
Pass the -D option to the ssh client on Linux, macOS, and other Unix platforms to create dynamic port forwarding (SOCKS):
ssh -D [LOCAL_IP:]LOCAL_PORT [USER@]SSH_SERVER
The following are the options that were used:
[LOCAL IP:]LOCAL_PORT- The IP address and port number of the local machine. The ssh client binds to localhost whenLOCAL_IPis missing.[USER@]SERVER_IP- The IP address of the remote SSH user.
Tunneling web browser traffic through an SSH server is a common example of dynamic port forwarding.
On port 9090, run the following command to construct a SOCKS tunnel:
ssh -D 9090 -N -f [email protected]
You can configure your application to use tunneling once it has been set up. This post will show you how to set up the SOCKS proxy in Firefox and Google Chrome.
Each application that you want to tunnel traffic through must have its own port forwarding configuration.
Set up SSH Tunneling on Windows
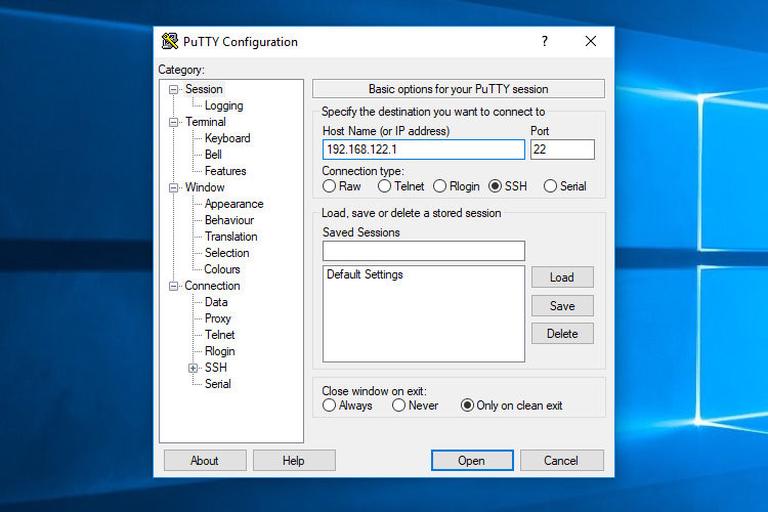
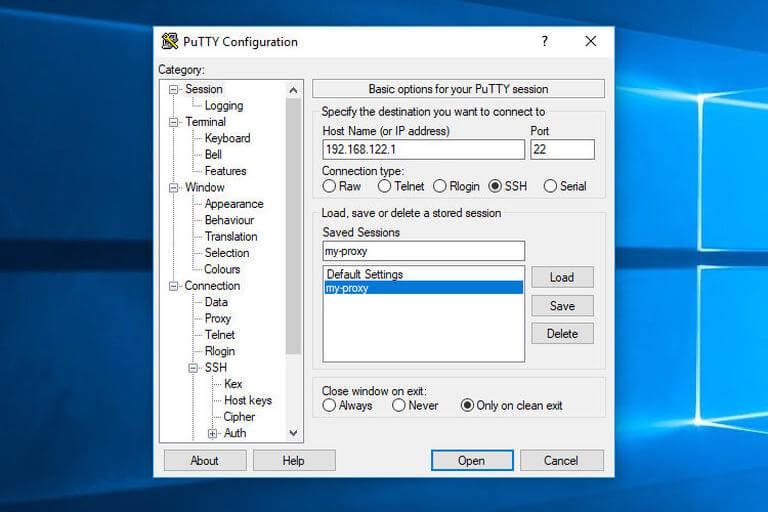
The PuTTY SSH client for Windows can be used to create SSH tunnels. PuTTY is available for download here.
- In the
Host name (or IP address)field of Putty, type the IP address of the SSH server.
2. Expand SSH and select Tunnels from the Connection menu. Select the Local radio button to configure local port forwarding, Remote for remote port forwarding, and Dynamic for dynamic port forwarding.
- Enter the local forwarding port in the
Source Portfield and the destination host and IP in theDestinationfield when configuring local forwarding, for example,localhost:5901. - Enter the remote SSH server forwarding port in the
Source Portfield, and the destination host and IP in theDestinationfield, for example,localhost:3000. - In the
Source Portsection, only enter the local SOCKS port if you're setting up dynamic forwarding.
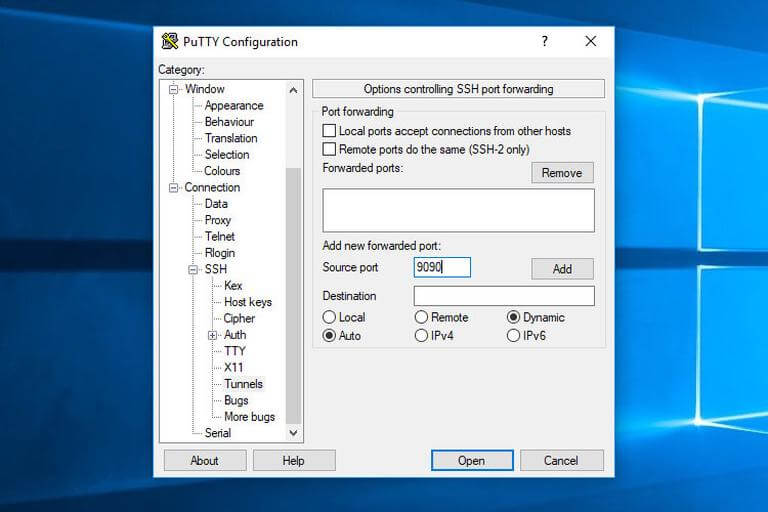
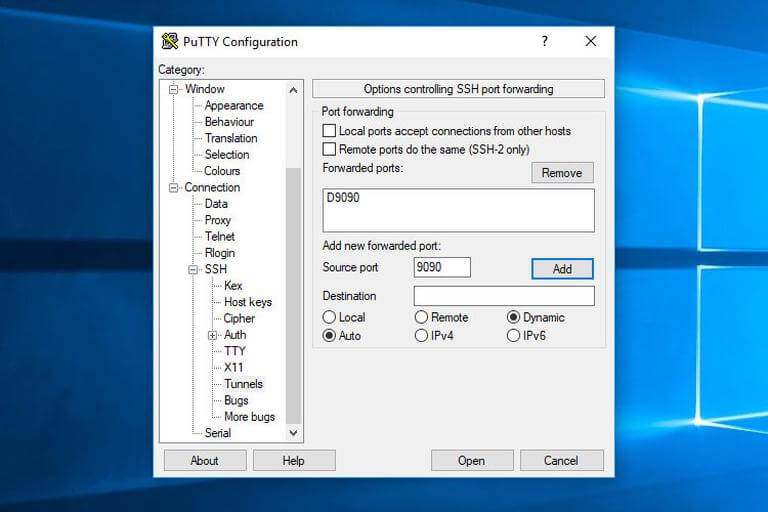
3. As indicated in the image below, click the Add button.
4. Return to the Session page to save your options, so you don't have to type them in every time. In the Saved Session area, type the name of the session and hit the Save button.
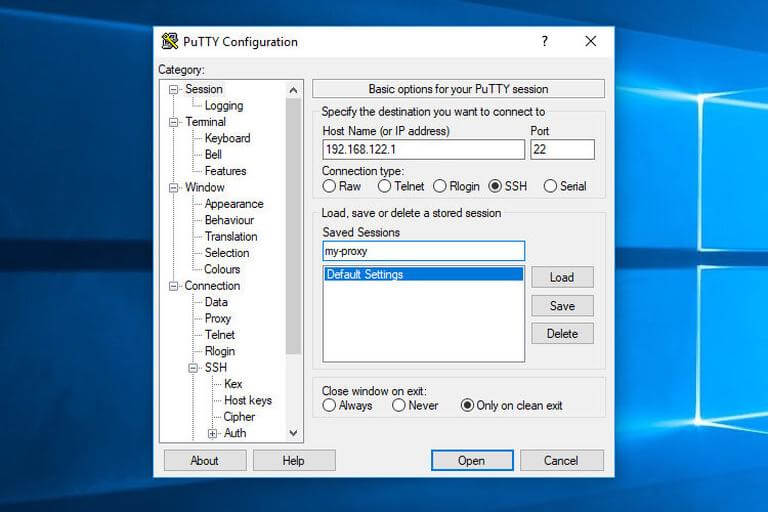
5. By clicking the Open button, you can select a previously stored session and connect it to the remote server.
A new window will appear, asking for your username and password. You will be logged in to your server and the SSH tunnel will be started once you submit your username and password.
You can connect to your server without inputting a password if you set up public-key authentication.
FAQs to Set up SSH Tunneling (Port Forwarding)
How does SSH tunneling work?
SSH tunneling forwards traffic from a local port on the client machine to a specified destination port on the server, encrypting the data in the process.
Why should I use SSH tunneling?
SSH tunneling provides enhanced security, remote access to services, bypassing of restrictions, efficient port forwarding, and data compression for improved performance.
How do I set up SSH tunneling?
To set up SSH tunneling, you need an SSH client and server. Configure the client to forward a local port to the desired server port using SSH command line or graphical tools.
Is SSH tunneling secure?
Yes, SSH tunneling utilizes strong encryption protocols, ensuring the confidentiality and integrity of data transmitted over the tunnel.
Can I use SSH tunneling for accessing remote databases?
Absolutely. SSH tunneling allows you to securely connect to remote databases by forwarding the database port through the SSH tunnel.
Does SSH tunneling require root/administrator privileges?
No, SSH tunneling can be set up by any user with SSH access to the server. Root/administrator privileges are only required if you specify a port below 1024.
Can SSH tunneling be used across different operating systems?
Yes, SSH tunneling is platform-independent. It can be set up between different operating systems as long as SSH clients and servers are available for those platforms.
Conclusion
We've demonstrated how to create SSH tunnels and route traffic through a secure SSH connection. You can specify the SSH tunnel in your SSH config file or create a Bash alias that will set up the SSH tunnel for convenience.
If you have any queries, please leave a comment below and we’ll be happy to respond to them.