
Choose a different version or distribution
Introduction
Before, we begin talking about the steps to install GitLab on Ubuntu 20.04. First, let's understand - What is GitLab?
GitLab is a powerful and versatile web-based Git repository manager that enables seamless collaboration and version control for software development projects. It provides a comprehensive suite of tools, including code hosting, issue tracking, CI/CD pipelines, and more.
GitLab's user-friendly interface and extensive features make it an ideal choice for teams to efficiently manage their code and streamline the development process. Embrace GitLab to enhance your software projects' productivity and success.
With the help of the GitLab project, you may easily install a GitLab instance on your own hardware. You will learn how to configure GitLab Community Edition on an Ubuntu 20.04 server in this tutorial.
Advantages of GitLab
- Powerful collaboration: GitLab fosters seamless teamwork, enabling multiple developers to work on the same project simultaneously.
- All-in-one platform: It combines code hosting, issue tracking, CI/CD, and more, streamlining the development workflow.
- Easy to use: GitLab's user-friendly interface simplifies code management, making it accessible for developers of all levels.
- Enhanced security: It offers robust security features like role-based access control and built-in authentication mechanisms.
- Scalable and flexible: GitLab adapts to your growing needs, accommodating projects of any size or complexity with ease.
Prerequisites to Install GitLab on Ubuntu 20.04
In order to follow along with this tutorial, you will need:
- An Ubuntu 20.04 server with a non-root
sudouser and a simple firewall.
According to the published GitLab hardware requirements, a server should have a minimum of:
- 4 cores for your CPU
- 4 GB of RAM for memory
Although you might be able to get by with some swap space in place of RAM, it is not advised. The examples that follow in this manual will make use of these minimal resources.
- A domain name that points to your server.
Step 1 — Installing the Dependencies
It is crucial to install the software that GitLab will use during the installation and on a regular basis before installing GitLab. The default package repositories of Ubuntu can be used to install the required software.
To begin, update the local package index:
sudo apt update
Then use the following command to install the dependencies:
sudo apt install ca-certificates curl openssh-server postfix tzdata perl
Some of this software most likely already exists on your computer. When prompted, choose Internet Site to install postfix. To configure how the system will send mail, enter your server's domain name on the next screen.
Now that you have installed the dependencies, you may install GitLab.
Step 2 — Installing GitLab
GitLab may be installed once the dependencies are set up. To set up your system with the GitLab repositories, this procedure makes use of an installation script.
The first step is to navigate to the /tmp directory:
cd /tmp
And after that download the installation script:
curl -LO https://packages.gitlab.com/install/repositories/gitlab/gitlab-ce/script.deb.sh
You are free to look over the downloaded script to make sure you approve of the actions it will take. A hosted version of the script is also available on the GitLab installation instructions script:
less /tmp/script.deb.sh
Run the installer as soon as you are certain that the script is secure:
sudo bash /tmp/script.deb.sh
The script configures your server to use the repositories hosted by GitLab. As a result, GitLab can be managed using the same package management tools as your other system packages. Once this is finished, use apt to install the GitLab application:
sudo apt install gitlab-ce
This could take some time to finish because it installs the necessary components on your system.
Step 3 — Adjusting the Firewall Rules
Make sure your firewall rules are permissive enough to enable web traffic before configuring GitLab. You should already have an ufw firewall configured if you followed the instructions in the prerequisites tutorial.
Use the following command to view your active firewall's current status:
sudo ufw status
Output
Status: active

To                         Action      From
--                         ------      ----
OpenSSH                    ALLOW       Anywhere
OpenSSH (v6)               ALLOW       Anywhere (v6)
The existing regulations permit SSH traffic, however, they impose limitations on access to other services. GitLab requires HTTP access because it is a web application. Allow HTTPS access, since you will be using GitLab's ability to request and enable a free TLS/SSL certificate from Let’s Encrypt.
The protocol for the port mapping for HTTP and HTTPS is accessible through the /etc/services file, so you can enable that traffic in by name. You should enable OpenSSH traffic if you have not already:
sudo ufw allow http
sudo ufw allow https
sudo ufw allow OpenSSH
You can double-check the ufw status to make sure you gave permission for at least these two services:
sudo ufw status
Output

Status: active

To                         Action      From
--                         ------      ----
OpenSSH                    ALLOW       Anywhere
80/tcp                     ALLOW       Anywhere
443/tcp                    ALLOW       Anywhere
OpenSSH (v6)               ALLOW       Anywhere (v6)
80/tcp (v6)                ALLOW       Anywhere (v6)
443/tcp (v6)               ALLOW       Anywhere (v6)
Once you configure the application, this output shows that the GitLab web interface is now accessible.
Step 4 — Editing the GitLab Configuration File
Run a reconfiguration command and update the configuration file before you may use the application. Open the setup file for GitLab in your preferred text editor first. In this example, we will use nano:
sudo nano /etc/gitlab/gitlab.rb
Find the external_url configuration line. Change the http to https to automatically redirect users to the site secured by the Let’s Encrypt certificate:
...
## GitLab URL
##! URL on which GitLab will be reachable.
##! For more details on configuring external_url see:
##! https://docs.gitlab.com/omnibus/settings/configuration.html#configuring-the-external-url-for-gitlab
##!
##! Note: During installation/upgrades, the value of the environment variable
##! EXTERNAL_URL will be used to populate/replace this value.
##! On AWS EC2 instances, we also attempt to fetch the public hostname/IP
##! address from AWS. For more details, see:
##! https://docs.aws.amazon.com/AWSEC2/latest/UserGuide/instancedata-data-retrieval.html
external_url 'https://your_domain'
...
Locate the letsencrypt['contact_emails'] setting next. By pressing CTRL+W when using nano, you can activate a search prompt. On the prompt, type letsencrypt['contact_emails'] and hit ENTER. This setting specifies a list of email addresses that the Let us Encrypt initiative can use to contact you if there are issues with your domain. It is advised that you remove your comment and complete this form so that you are aware of any potential problems:
letsencrypt['contact_emails'] = ['[email protected]']
Once you have finished making changes, save and close the file. You can do this in nano by typing CTRL+X, then Y, then ENTER.
Execute the following command to reconfigure GitLab:
sudo gitlab-ctl reconfigure
The data it can find about your server will be used to initialize GitLab as a result. You will not have to respond to any prompts because this procedure is entirely automated. A Let's Encrypt certificate will be configured for your domain as part of the procedure.
Step 5 — Performing Initial Configuration Through the Web Interface
You can perform an initial configuration of the application through the web interface while GitLab is running.
Logging In for the First Time
Open your web browser and navigate to the GitLab server's domain name:
https://your_domain
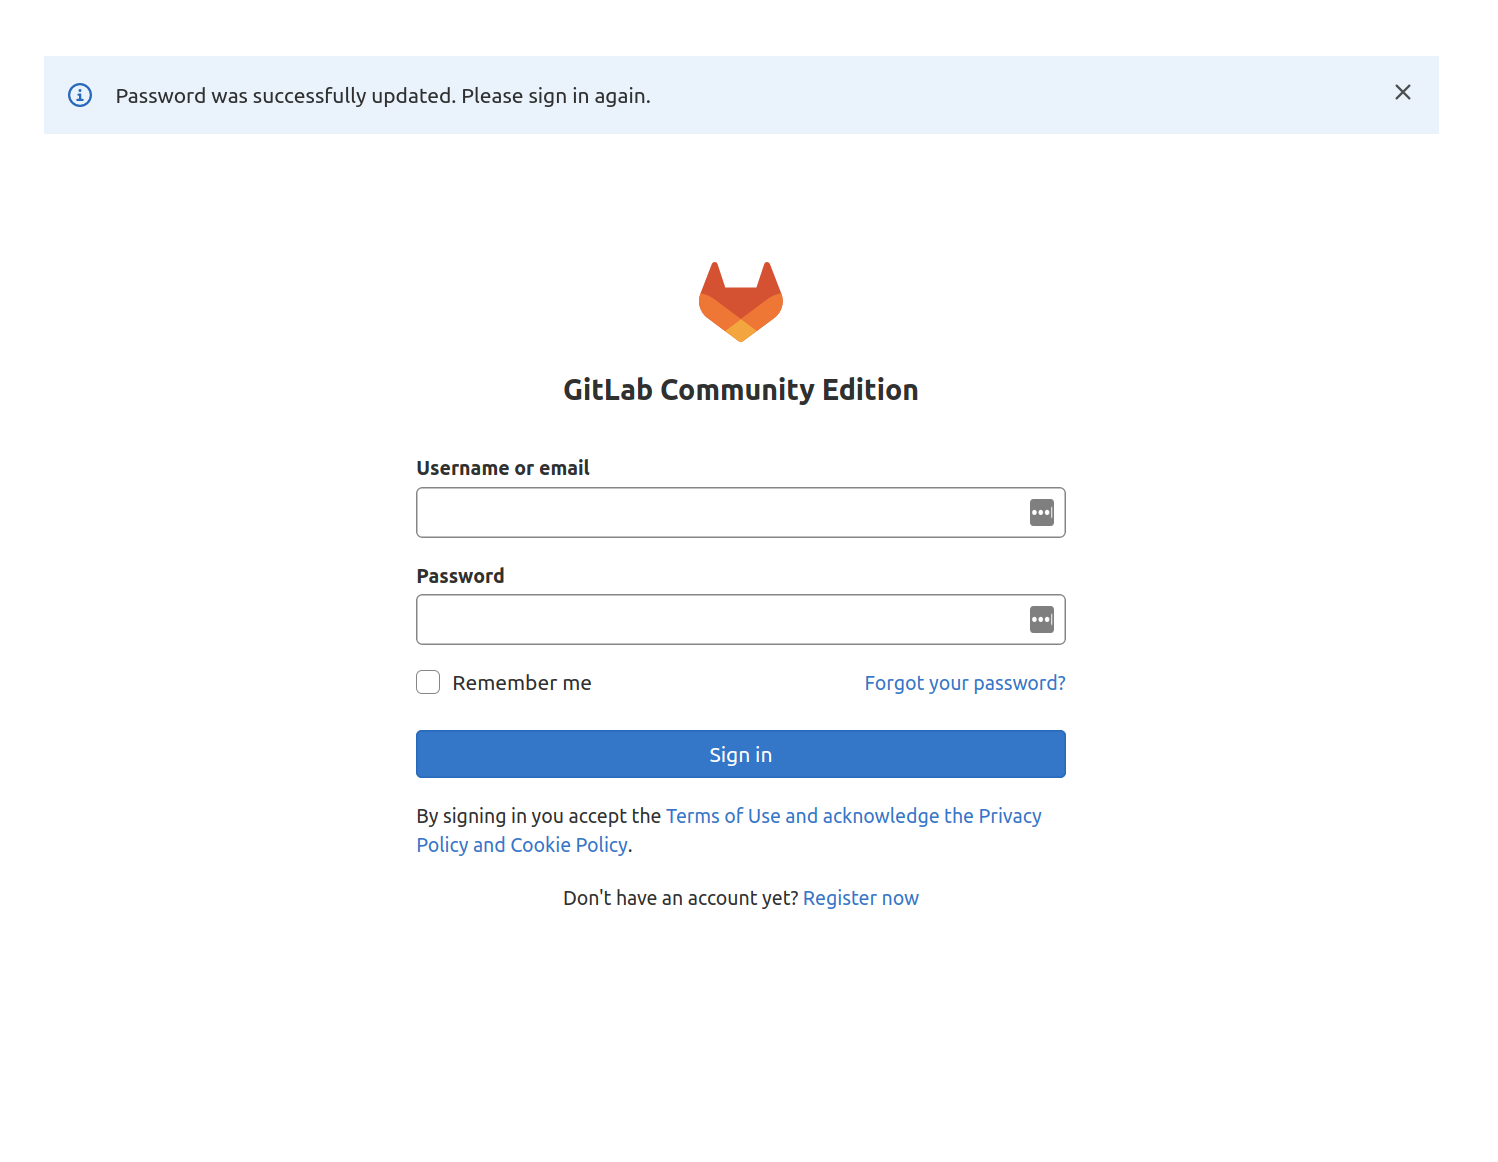
You will see a login page when you first visit:
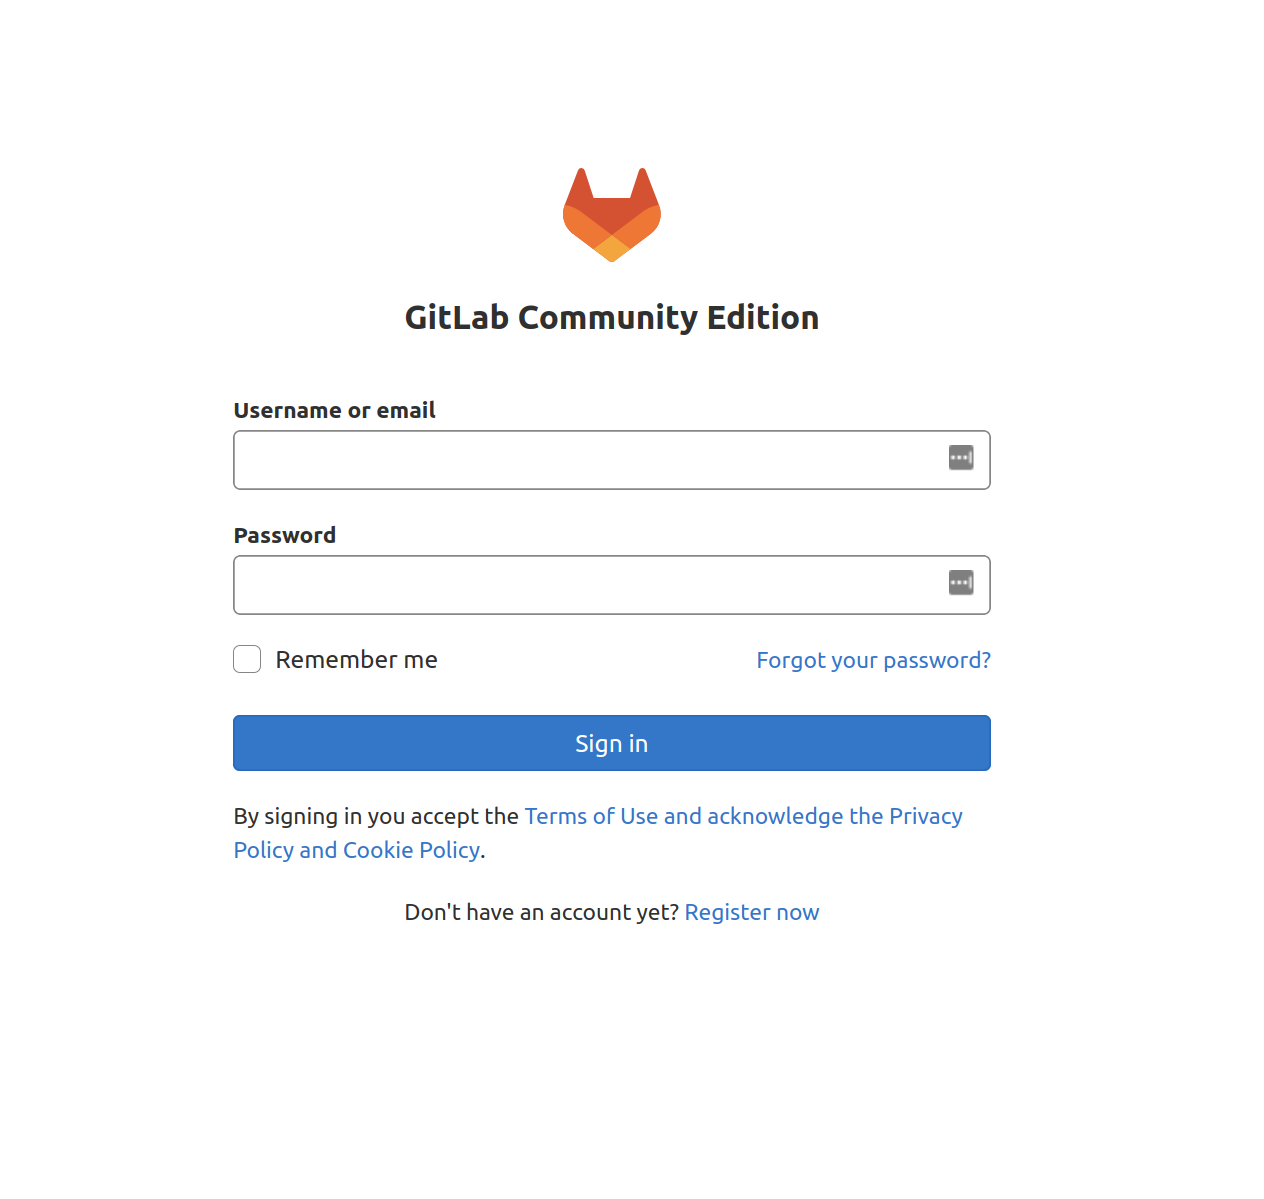
GitLab will generate a secure password for you. It is kept in a folder that you can access as an administrative sudo user:
sudo nano /etc/gitlab/initial_root_password
# WARNING: This value is valid only in the following conditions
#          1. If provided manually (either via `GITLAB_ROOT_PASSWORD` environment variable or via `gitlab_rails['initial_root_password']` setting in `gitlab.rb`, it was provided before database was seeded for the firs$
#          2. Password hasn't been changed manually, either via UI or via command line.
#
#          If the password shown here doesn't work, you must reset the admin password following https://docs.gitlab.com/ee/security/reset_user_password.html#reset-your-root-password.

Password: YOUR_PASSWORD

# NOTE: This file will be automatically deleted in the first reconfigure run after 24 hours.
Return to the login page and type the following:
- Username: root
- Password: [the password listed on
/etc/gitlab/initial_root_password]
Insert these values into the fields and then click the Sign in button. After logging in, the application will lead you to a landing screen where it asks you to start adding projects:
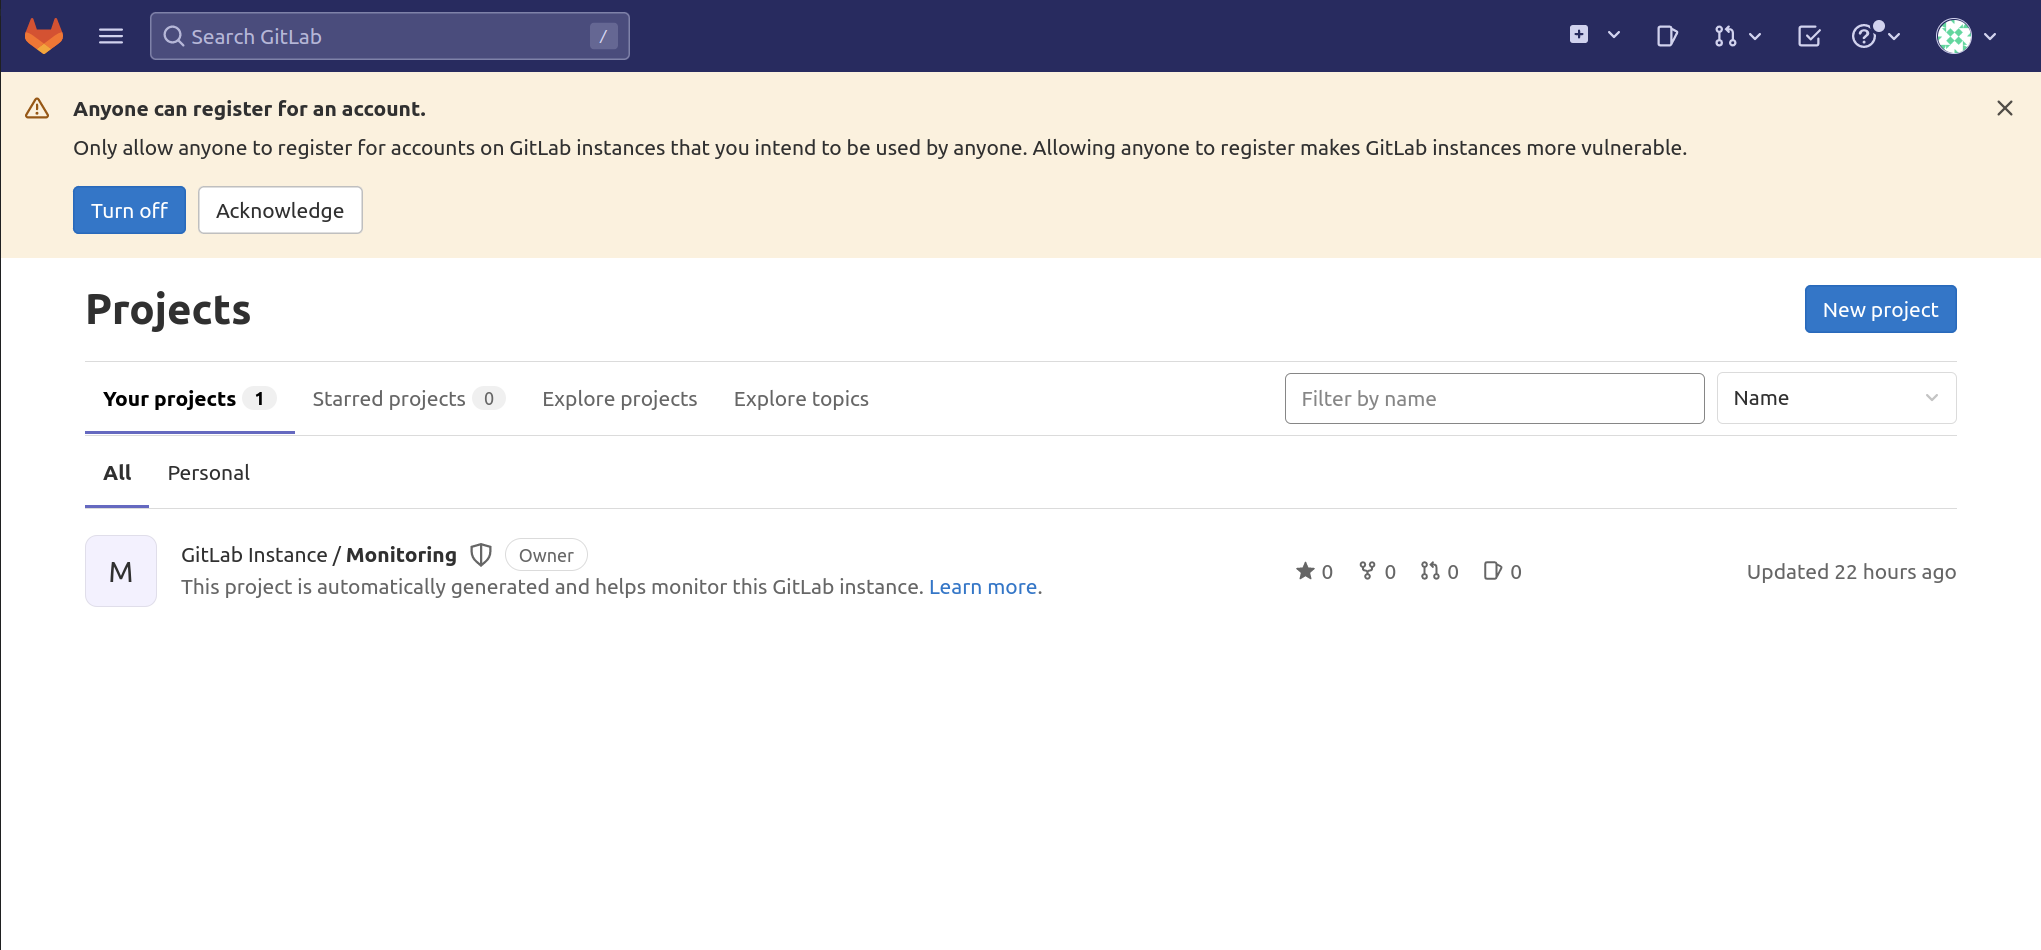
Your GitLab instance can now be adjusted.
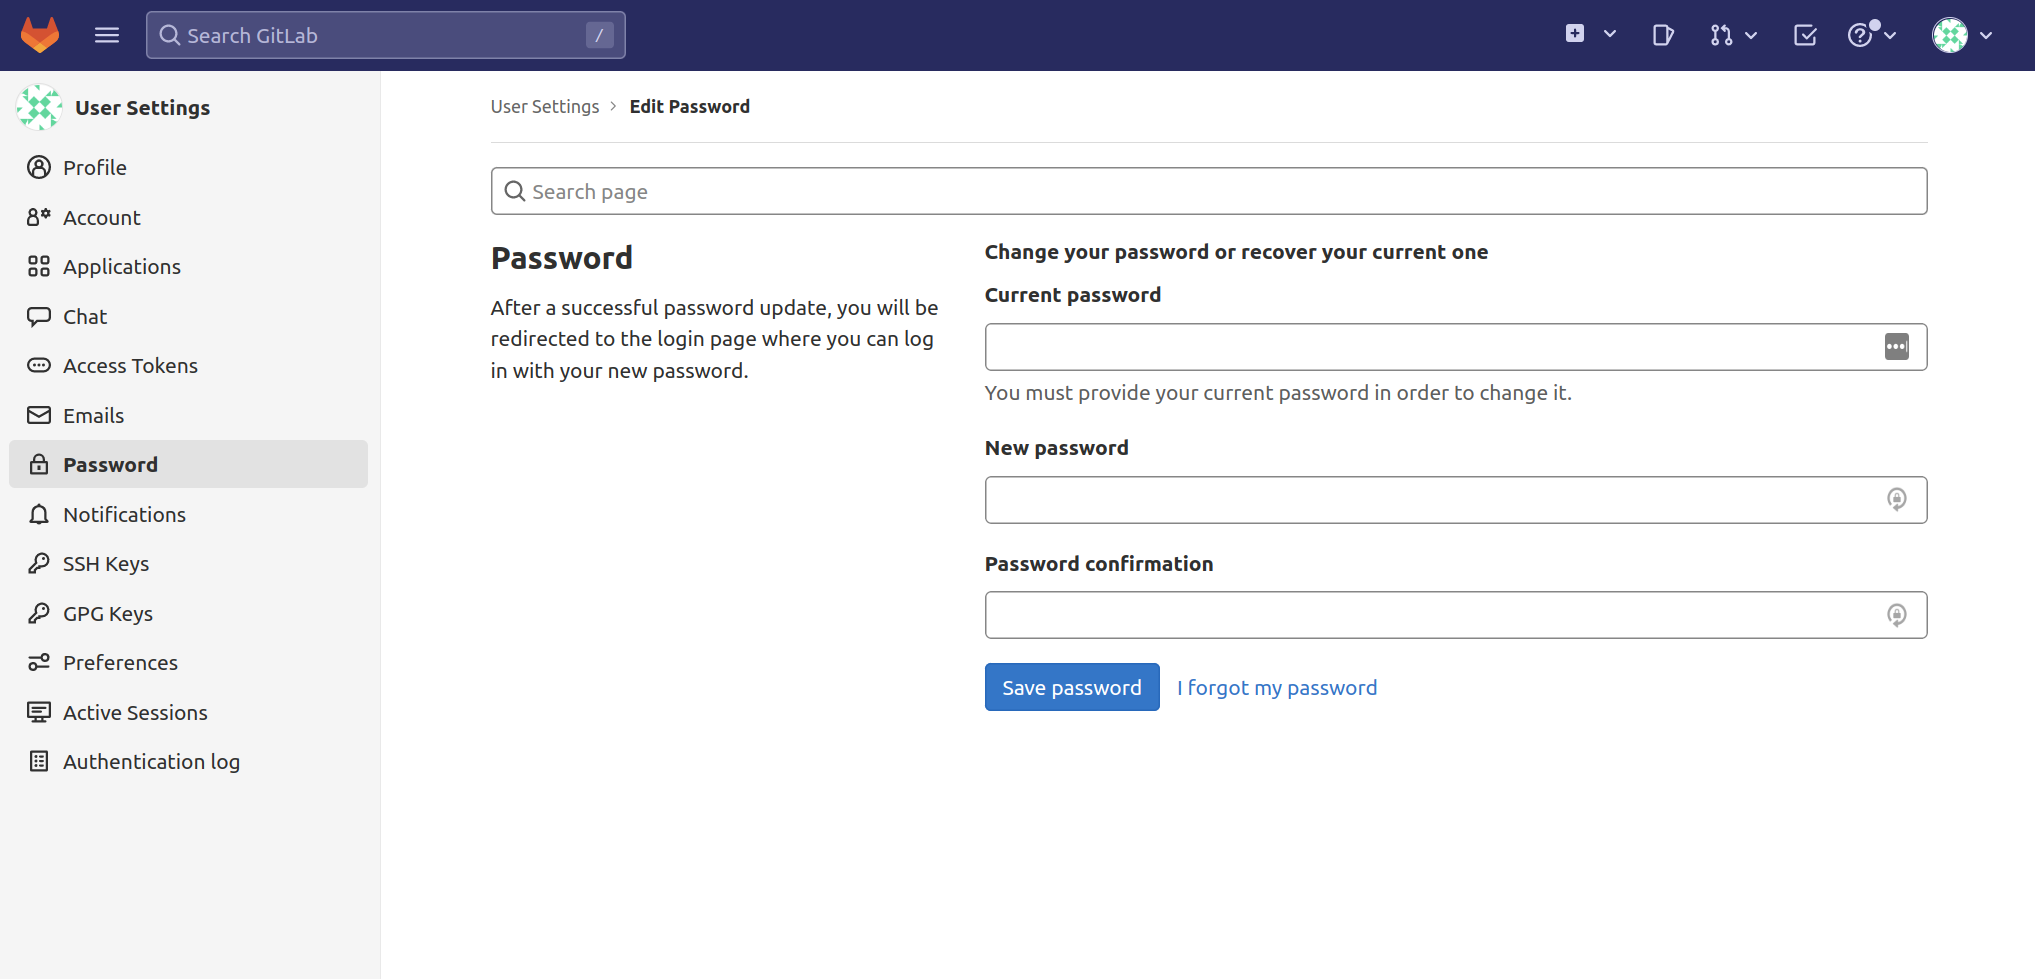
Updating Your Password
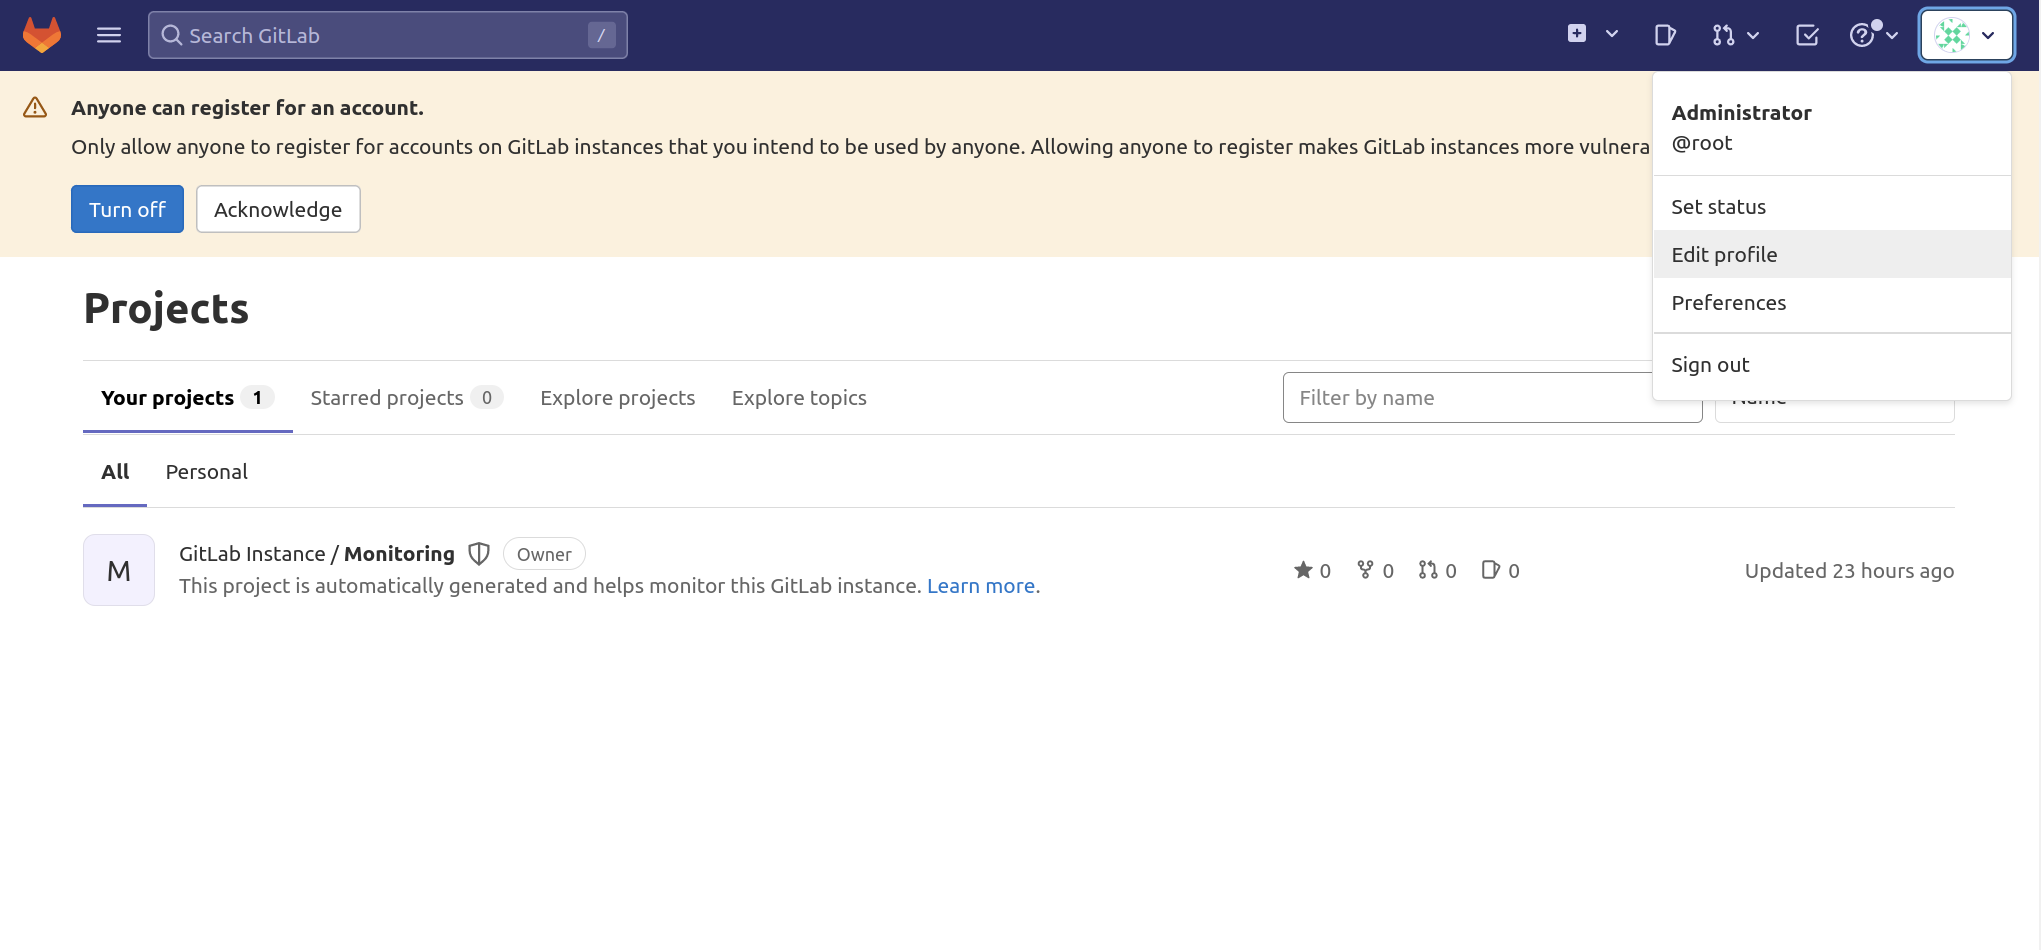
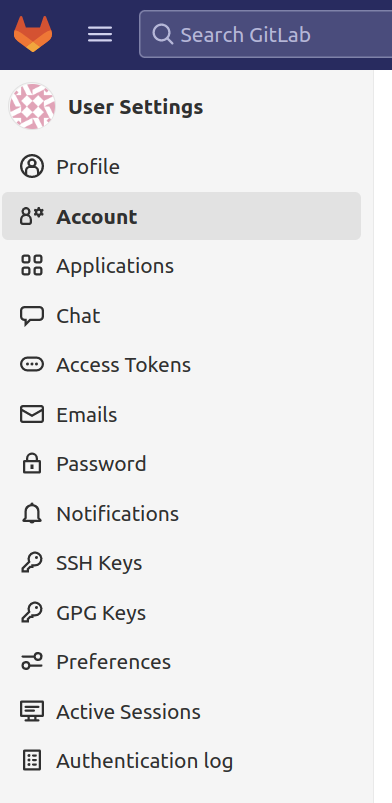
When checking in, one of the first things you should do is change your password. Click on the icon in the top-right corner of the navigation bar and choose Edit Profile to make this change:
A page with user settings will then appear. When you are satisfied with your adjustments, click on the Save password option under Password on the left navigation bar to save your new, secure GitLab-generated password:
Your password has been changed, and you will get a notification when you return to the login screen. To log back into your GitLab instance, enter your new password:
Adjusting your Profile Settings
GitLab chooses some fair settings, but they are rarely appropriate once you begin using the software.
Click on the user icon in the top-right corner of the navigation bar and select Edit Profile to make the necessary changes.
Change “Administrator” and “[email protected]” to something more precise in the Name and Email fields. Other users will see the name you choose, and the email will be used for notifications, default avatar detection, Git operations through the interface, and more:
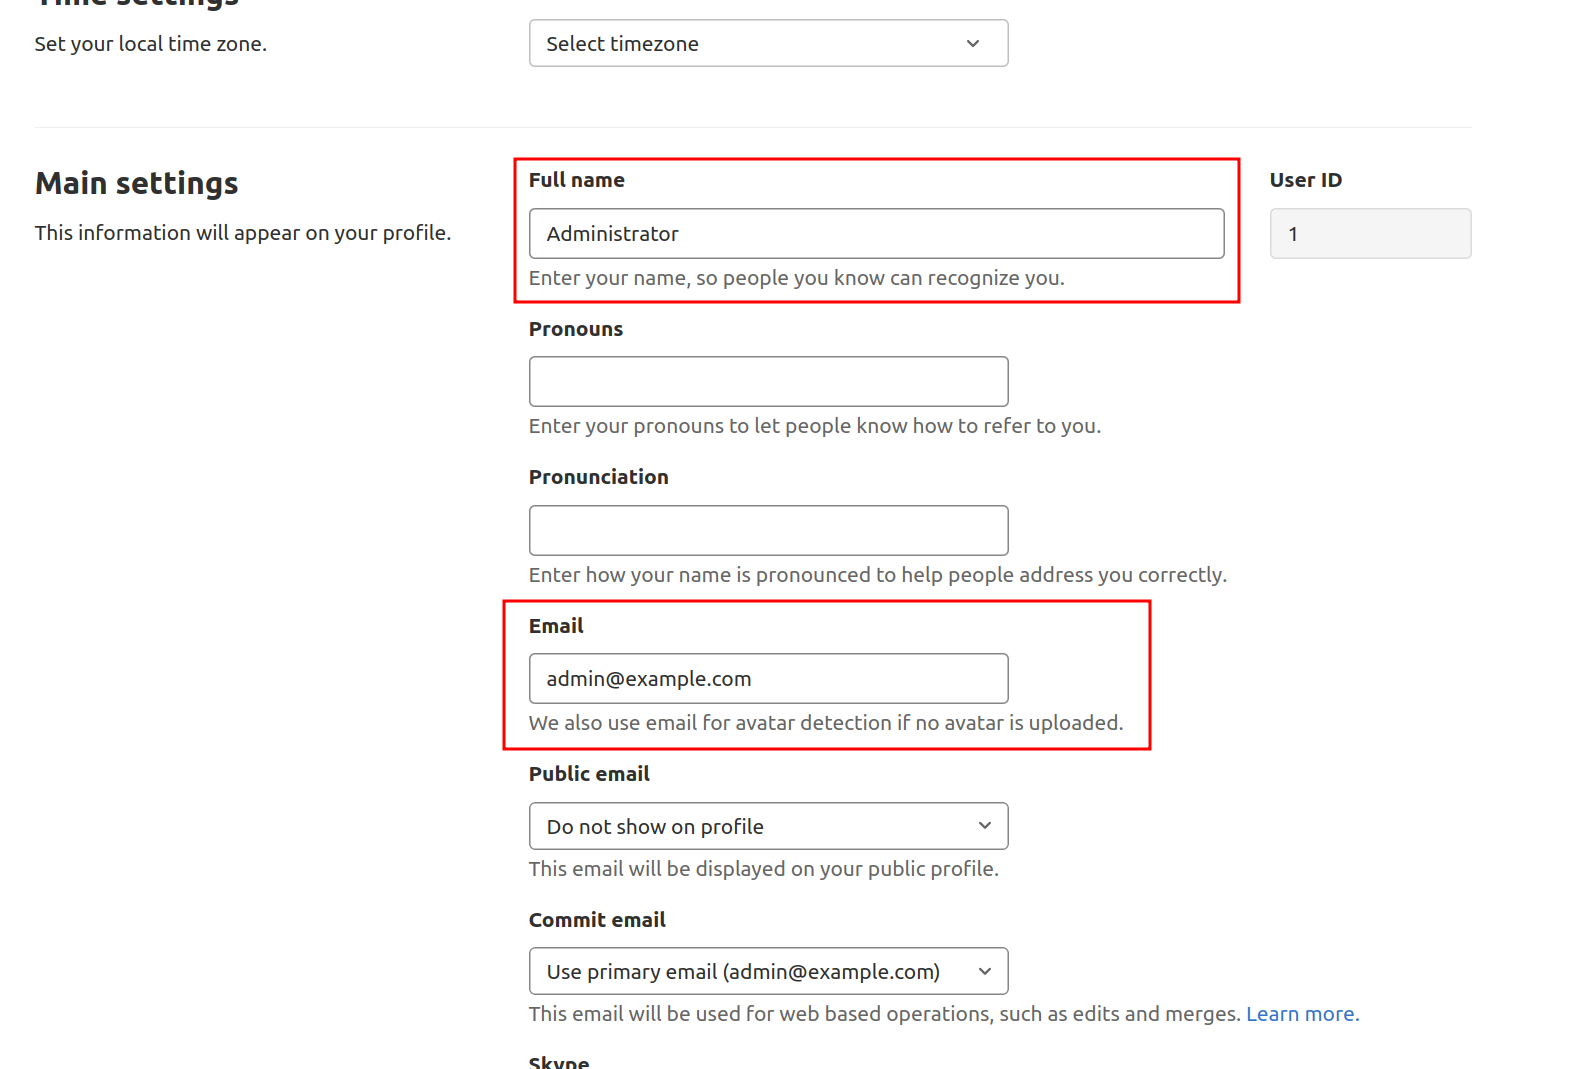
Once your updates are complete, click the Update Profile settings option at the bottom. To confirm changes, you will be requested to enter your password.
You will receive a confirmation email at the address you supplied. To activate your account and start using it with GitLab, follow the email's instructions for confirmation.
Changing Your Account Name
Choose Account from the left navigation bar after that:
You may modify your username and enable two-factor authentication here. The first administrative account's name by default is root. It is safer to alter this to a different name, as this is a well-known account name. The only thing that will have changed is the name; you will still have administrative rights. Replace root with the username of your choice:
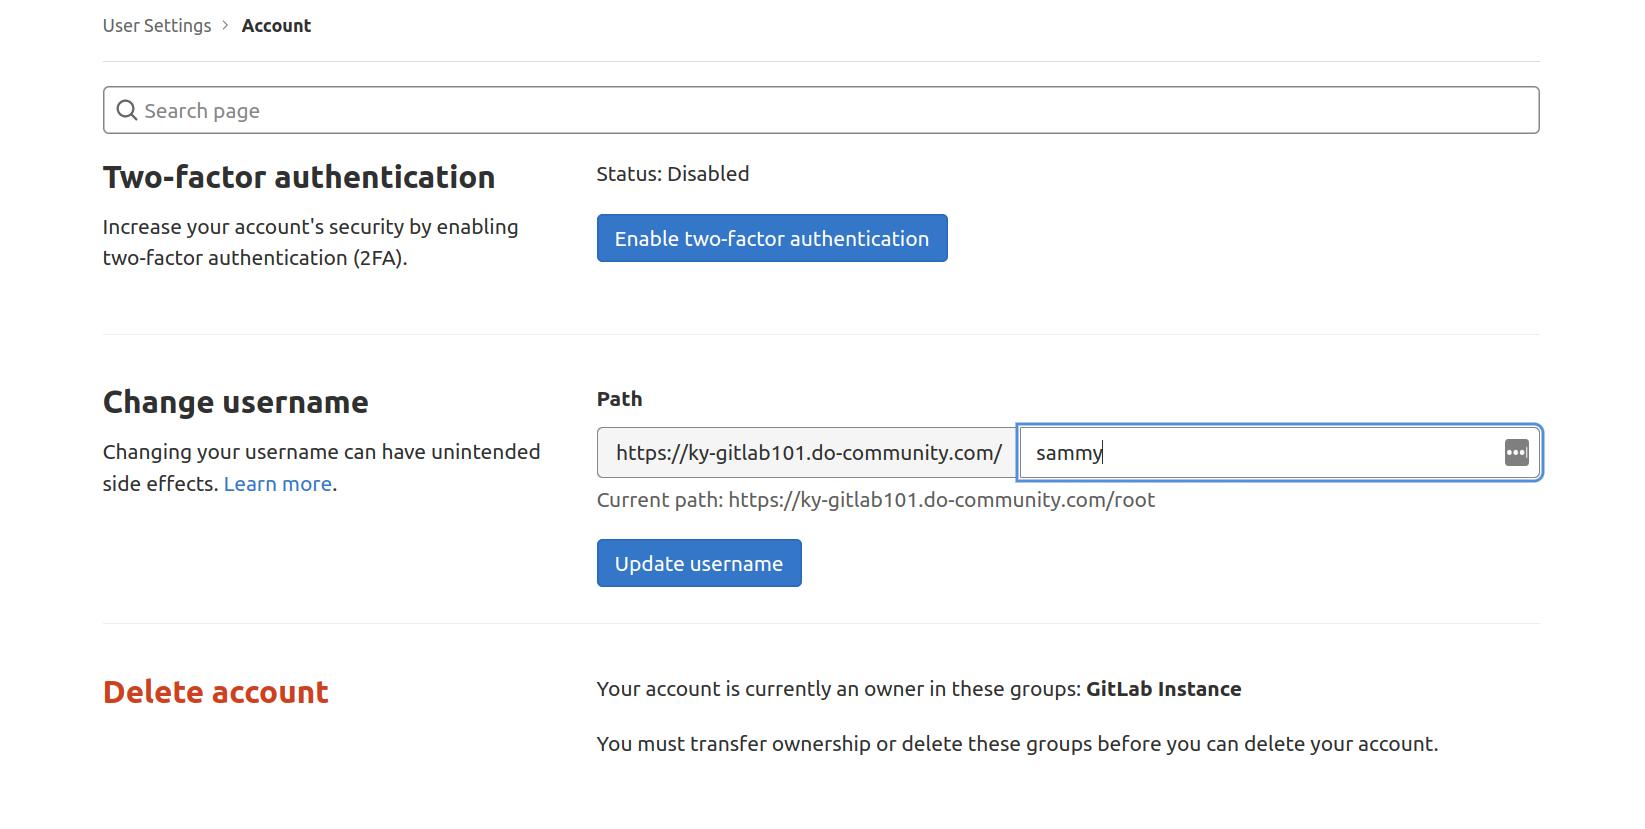
To update the username, click the Update username button. After that, you will be asked to confirm the changes.
Please use your new username when you log into GitLab next.
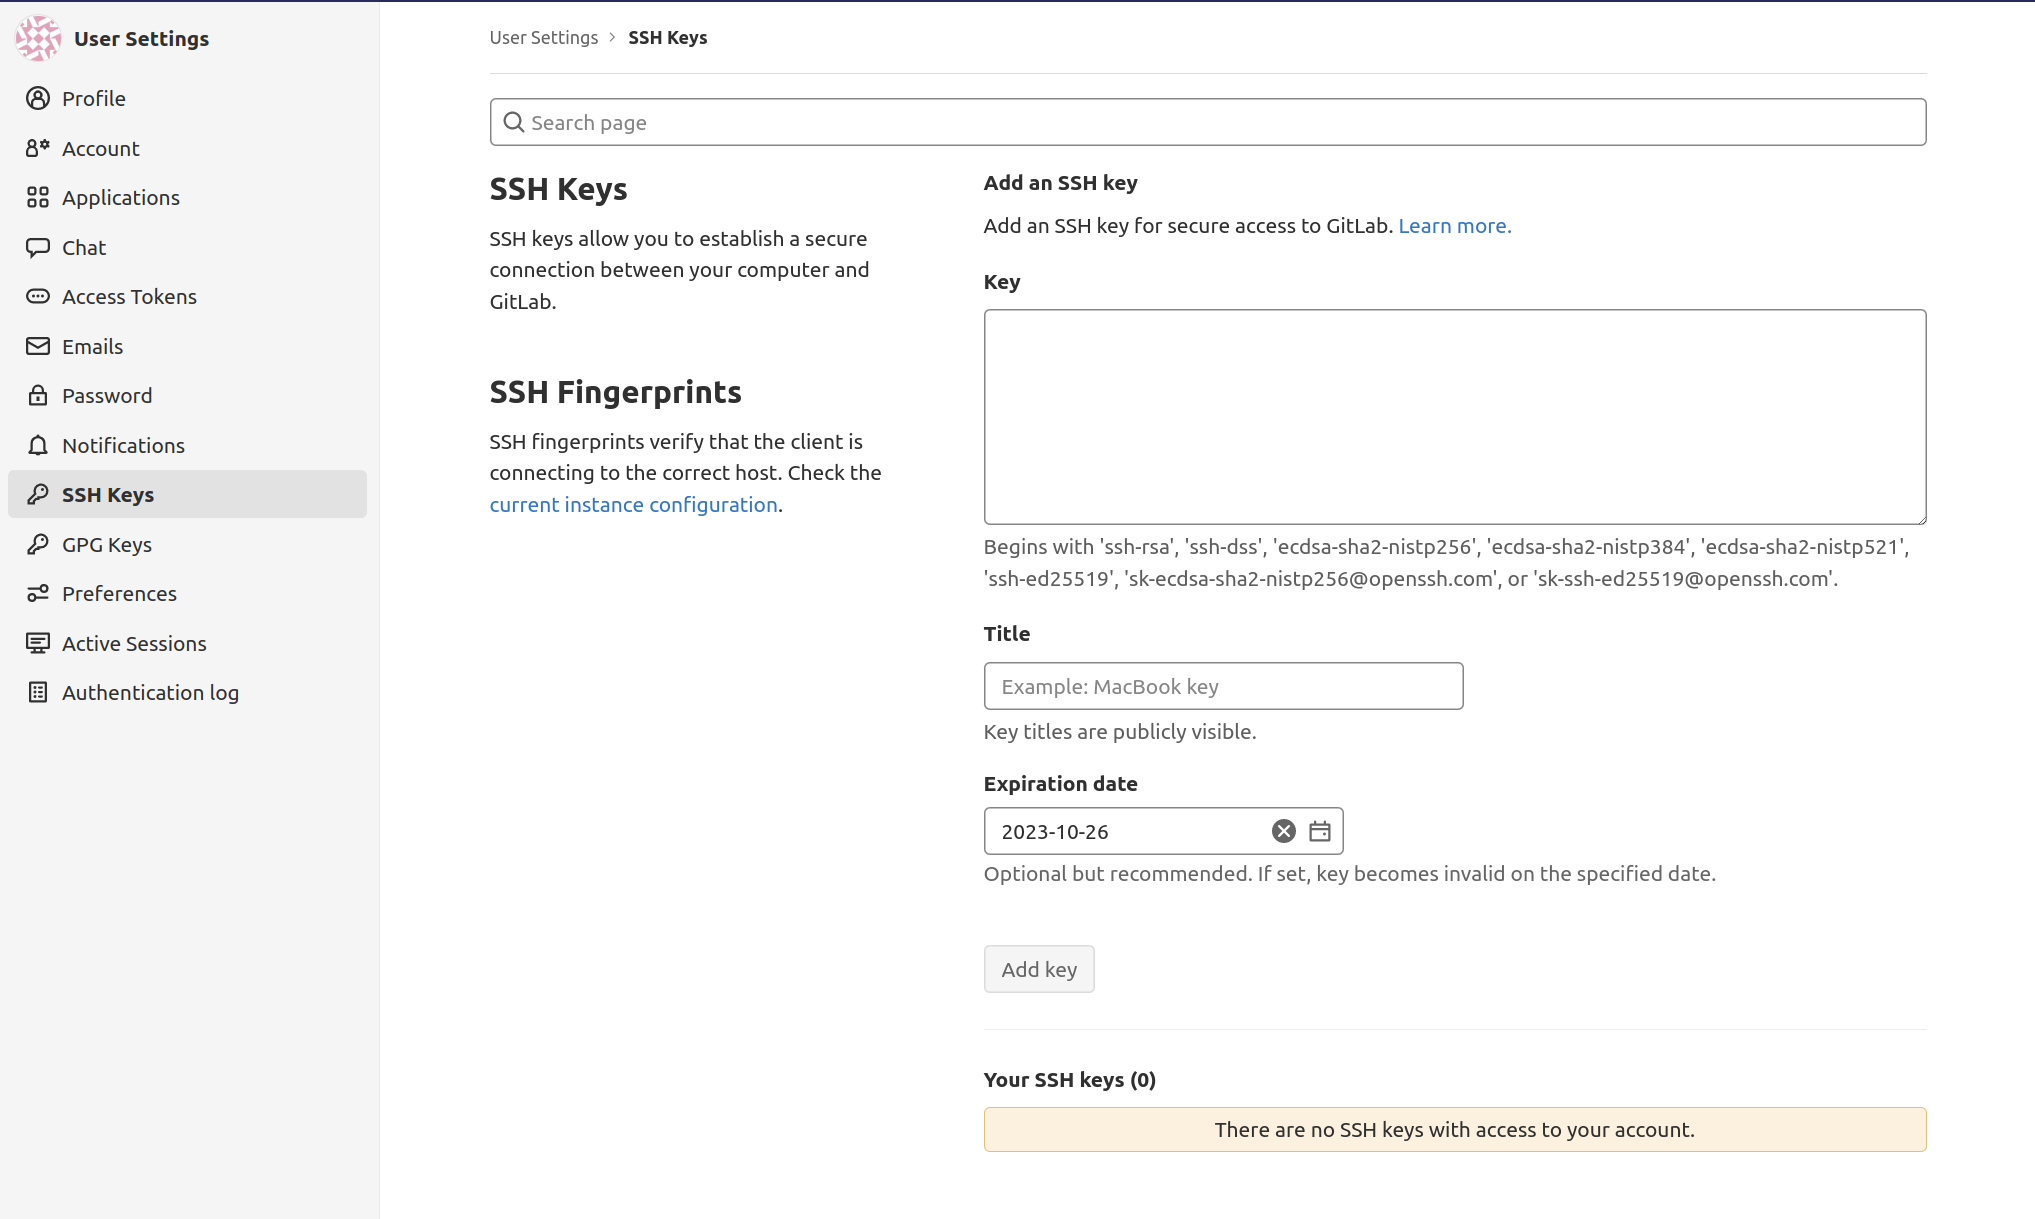
Adding an SSH Key to your Account
While using Git to interact with your GitLab projects, SSH keys can be enabled. Your SSH public key must be added to your GitLab account in order to accomplish this.
Choose SSH Keys from the left navigation bar.
You can view the public key if you already have an SSH key pair created on your local system by typing:
cat ~/.ssh/id_rsa.pub
Output
ssh-rsa AAAAB3NzaC1yc2EAAAADAQABAAABAQDMuyMtMl6aWwqBCvQx7YXvZd7bCFVDsyln3yh5/8Pu23LW88VXfJgsBvhZZ9W0rPBGYyzE/TDzwwITvVQcKrwQrvQlYxTVbqZQDlmsC41HnwDfGFXg+QouZemQ2YgMeHfBzy+w26/gg480nC2PPNd0OG79+e7gFVrTL79JA/MyePBugvYqOAbl30h7M1a7EHP3IV5DQUQg4YUq49v4d3AvM0aia4EUowJs0P/j83nsZt8yiE2JEYR03kDgT/qziPK7LnVFqpFDSPC3MR3b8B354E9Af4C/JHgvglv2tsxOyvKupyZonbyr68CqSorO2rAwY/jWFEiArIaVuDiR9YM5 sammy@mydesktop
Copy this text, then paste it into the Key text box inside your GitLab instance.
If you receive a different message, your system does not yet have an SSH key pair configured:
Output
cat: /home/sammy/.ssh/id_rsa.pub: No such file or directory
In this situation, you can create an SSH key pair by executing the below command:
ssh-keygen
Accept the settings and, if you want, enter a password to protect the key locally:
Output

Generating public/private rsa key pair.
Enter file in which to save the key (/home/sammy/.ssh/id_rsa):
Enter passphrase (empty for no passphrase):
Enter same passphrase again:
Your identification has been saved in /home/sammy/.ssh/id_rsa.
Your public key has been saved in /home/sammy/.ssh/id_rsa.pub.
The key fingerprint is:
SHA256:I8v5/M5xOicZRZq/XRcSBNxTQV2BZszjlWaIHi5chc0 [email protected]
The key's randomart image is:
+---[RSA 2048]----+
|          ..%o==B|
|           *.E =.|
|        . ++= B  |
|         ooo.o . |
|      . S .o  . .|
|     . + .. .   o|
|      +   .o.o ..|
|       o .++o .  |
|        oo=+     |
+----[SHA256]-----+
Once you have it, you can type the following command to display your public key as in the previous example:
cat ~/.ssh/id_rsa.pub
Output
ssh-rsa AAAAB3NzaC1yc2EAAAADAQABAAABAQDMuyMtMl6aWwqBCvQx7YXvZd7bCFVDsyln3yh5/8Pu23LW88VXfJgsBvhZZ9W0rPBGYyzE/TDzwwITvVQcKrwQrvQlYxTVbqZQDlmsC41HnwDfGFXg+QouZemQ2YgMeHfBzy+w26/gg480nC2PPNd0OG79+e7gFVrTL79JA/MyePBugvYqOAbl30h7M1a7EHP3IV5DQUQg4YUq49v4d3AvM0aia4EUowJs0P/j83nsZt8yiE2JEYR03kDgT/qziPK7LnVFqpFDSPC3MR3b8B354E9Af4C/JHgvglv2tsxOyvKupyZonbyr68CqSorO2rAwY/jWFEiArIaVuDiR9YM5 sammy@mydesktop
Enter this text block in the output's Key text field on your GitLab instance after inserting it there. Give it a descriptive name and then click the Add key button.
Now, you can manage your GitLab projects and repositories from your local machine without having to enter your GitLab login information.
Step 6 — Restricting or Disabling Public Sign-ups
With your present configuration, anyone can sign up for an account when they visit your GitLab instance's landing page. If you wish to host a public project, this might be what you are looking for. Nonetheless, more restrictive settings are often preferred.
To get started, click the hamburger menu in the top navigation bar and choose Admin from the drop-down menu to access the administrative area:

From the left navigation bar, choose Settings:
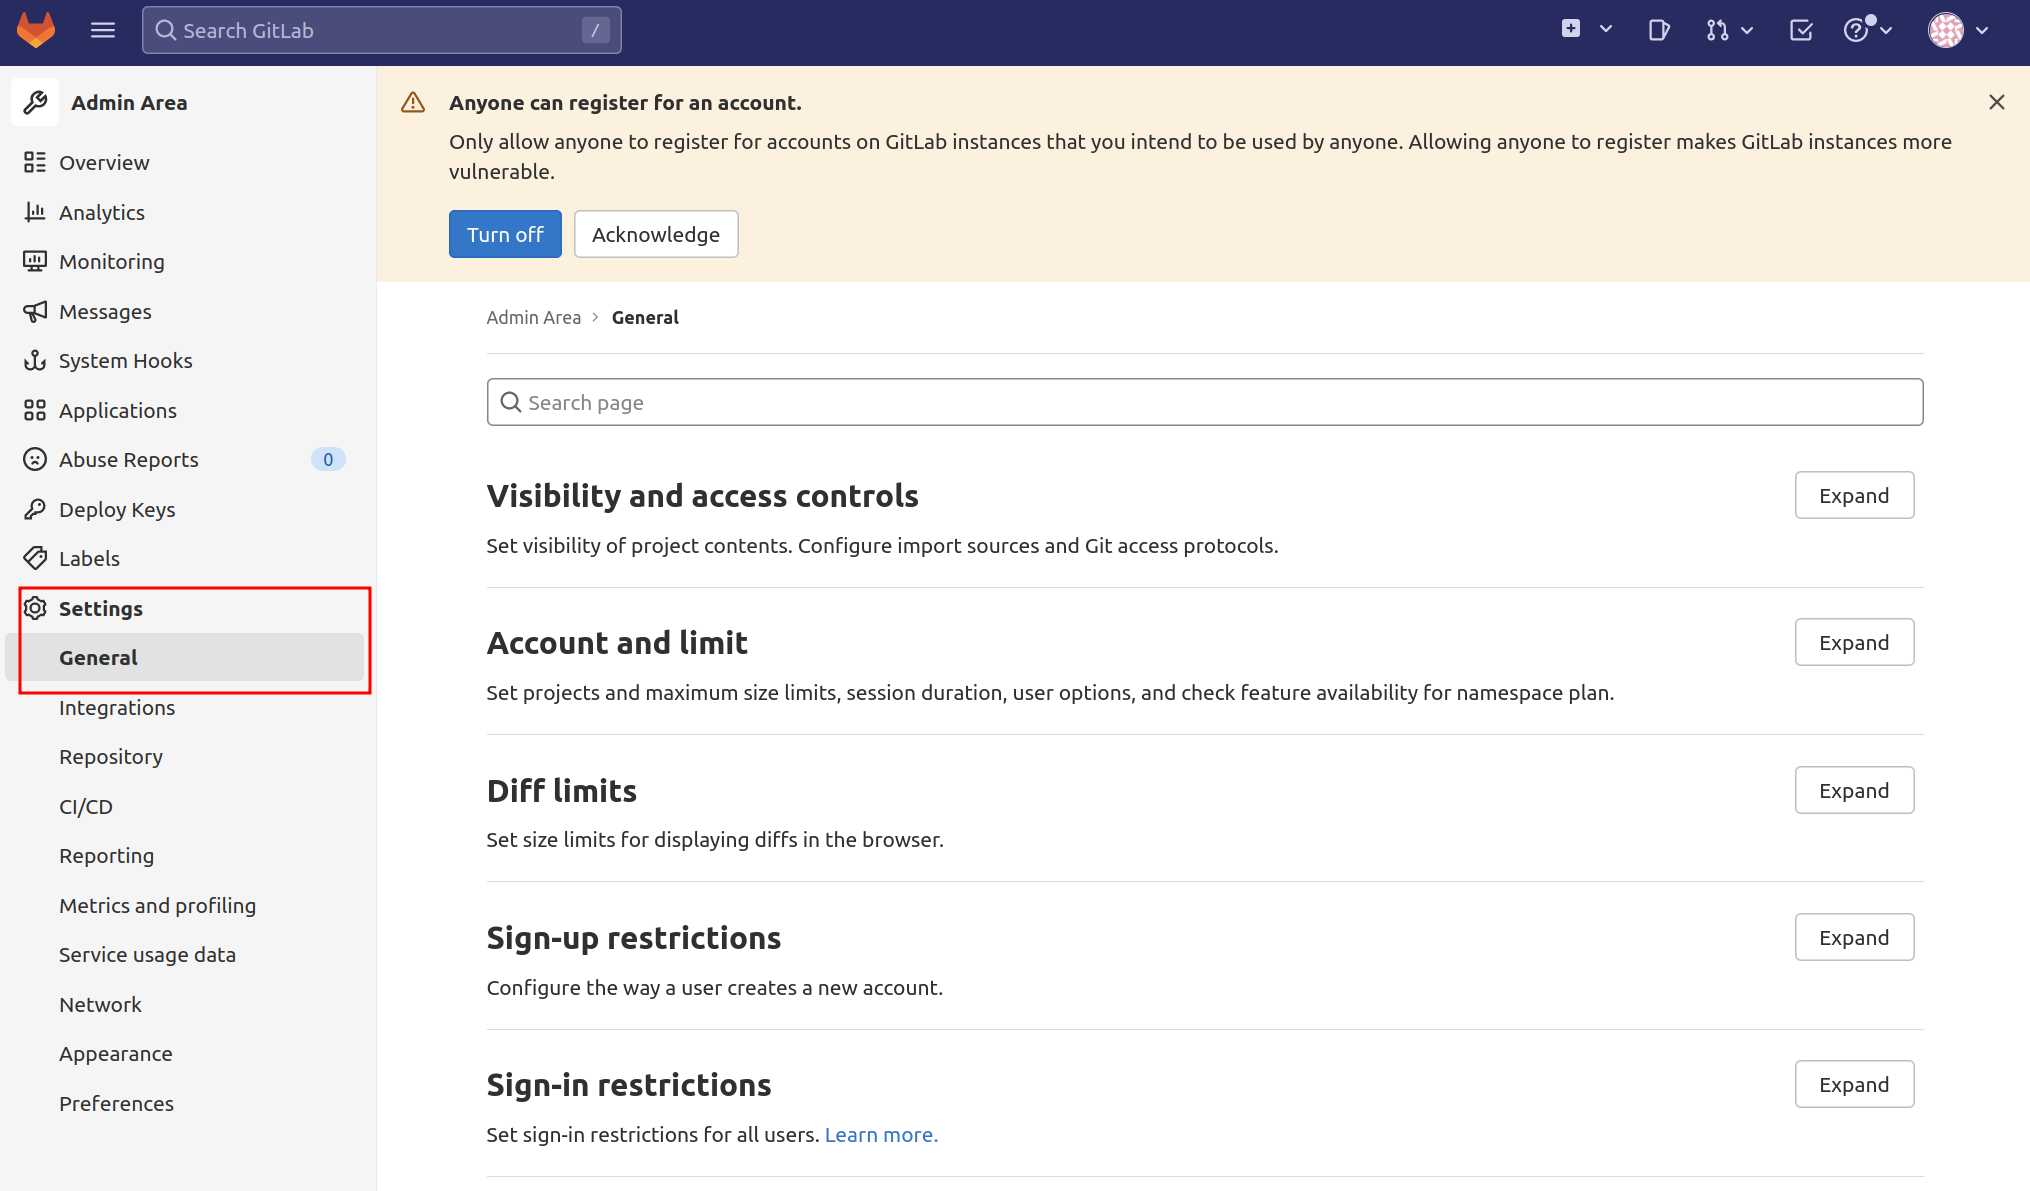
Your GitLab instance's global settings will be displayed to you. Many options that control whether new users can register and their level of access can be changed here.
Disabling Sign-ups
If you want to entirely disable sign-ups, go to the Sign-up Restrictions area and press Expand to view the options.
Then, uncheck the item that says Sign-up enabled:

Once you have finished making your changes, do not forget to click the Save changes option.
The GitLab landing page no longer has a sign-up option.
Restricting Sign-ups By Domain
You can limit sign-ups by domain rather than fully blocking them if you use GitLab as part of an organization that offers email addresses linked to a domain.
Use the option to Send confirmation email on sign-up in the Sign-up Restrictions area to prevent users from logging in until they have done so.
Then, enter your domain(s), one domain per line, in the Whitelisted domains for sign-ups box. To specify wildcard domains, use the asterisk "*":
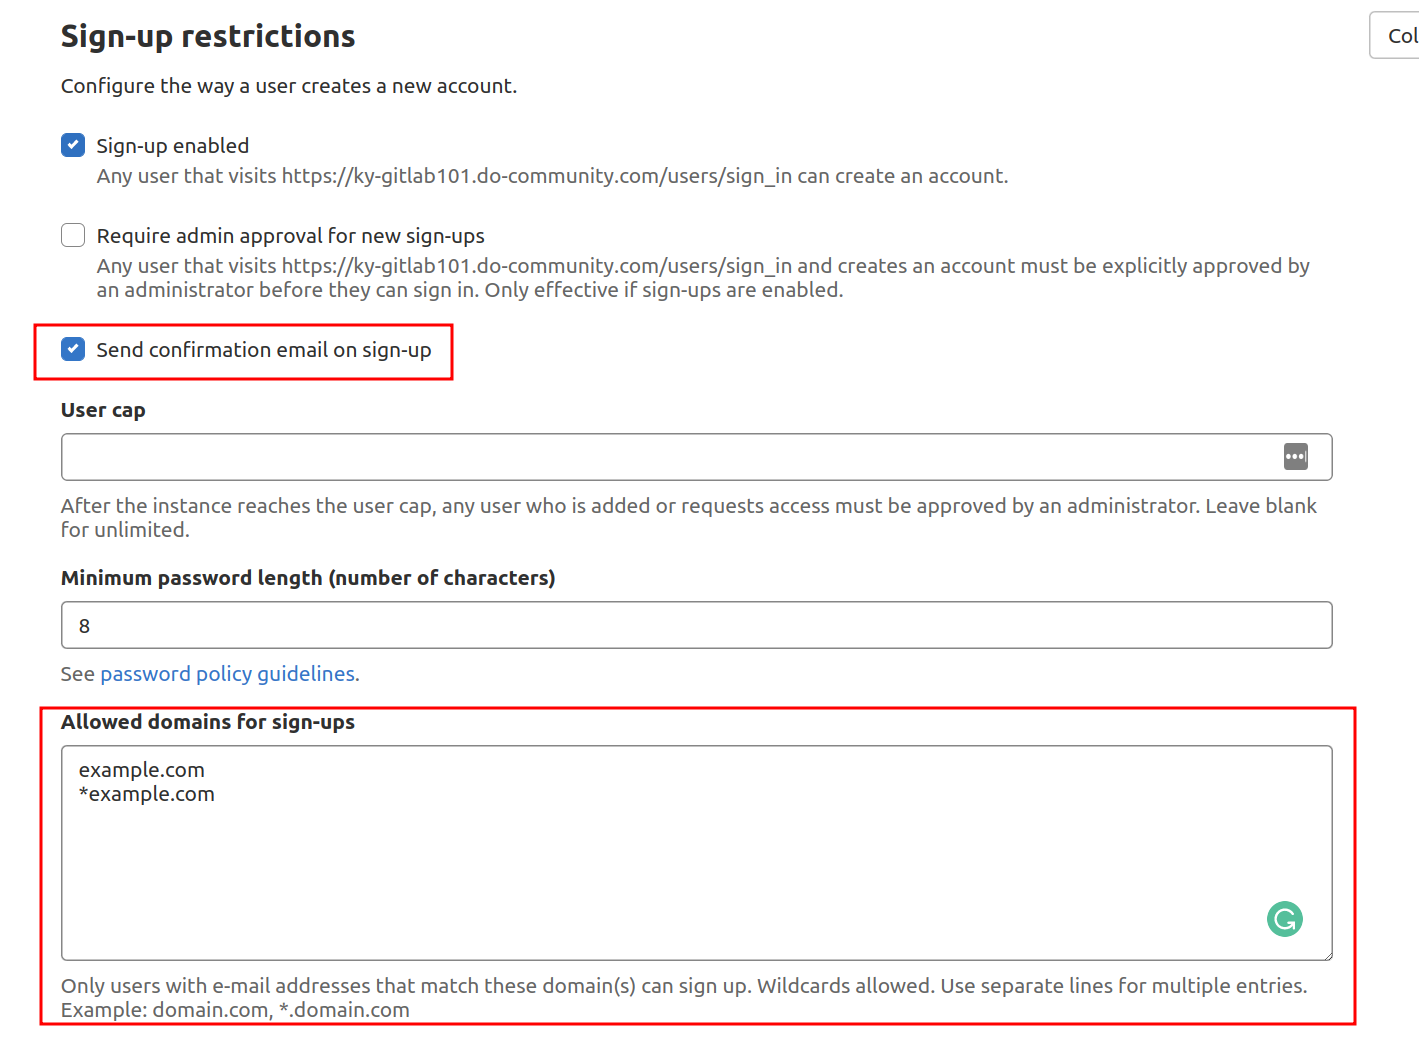
After you are done, press the Save changes button.
The sign-up section on the GitLab landing page has been removed.
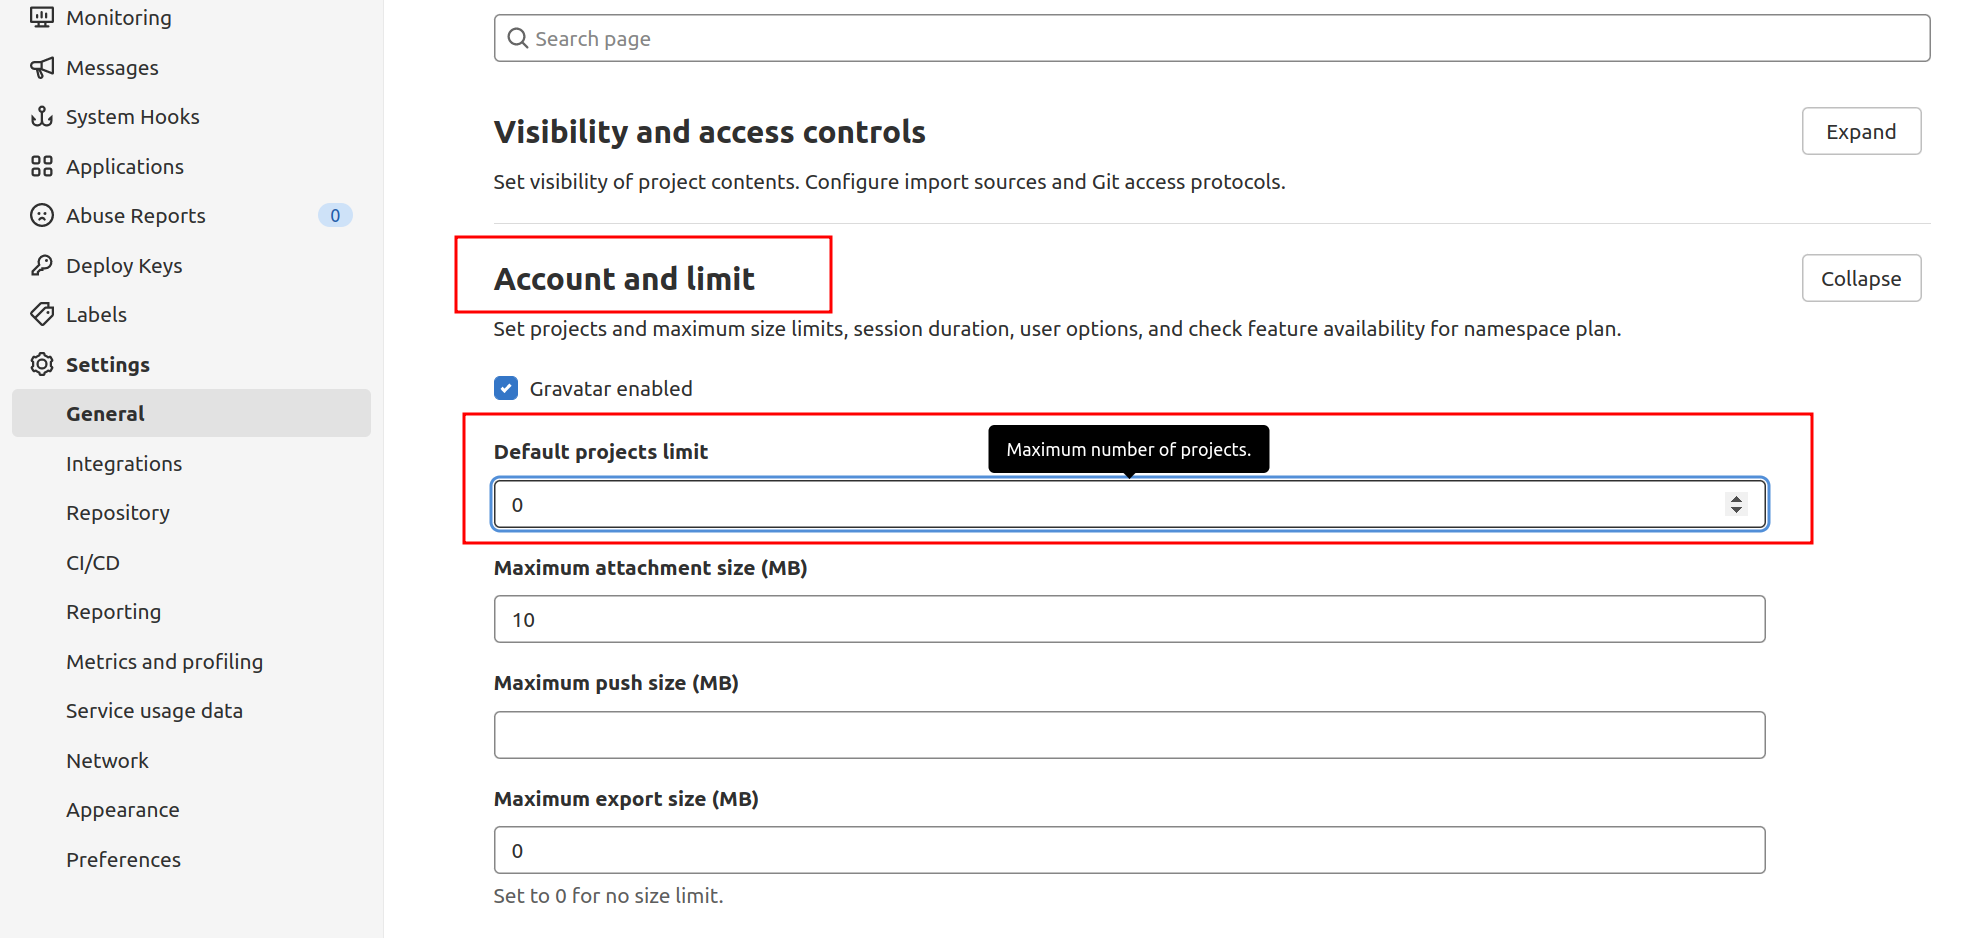
Restricting Project Creation
By default, new users can create up to ten projects. You can accept new users from the outside for visibility and participation while restricting their ability to create new projects in the Account and Limit Settings section.
Here, you can set the Default projects limit to 0 to prevent new users from creating projects entirely:
Users can still manually add new users to projects and grant them access to private or public projects developed by other users.
Remember to click the Save changes button after making your changes.
Now, new users will be allowed to create accounts but not projects.
Renewing Let’s Encrypt Certificates
GitLab has a scheduled process set up by default to renew Let's Encrypt certificates after midnight every fourth day, with the exact minute depending on your external_url. These settings can be changed in the /etc/gitlab/gitlab.rb file.
You may configure it to renew, for instance, at 12:30 on the seventh day. Go to the configuration file first:
sudo nano /etc/gitlab/gitlab.rb
Then, locate the lines in the file that begin with the # and replace them with the following:
...
################################################################################
# Let's Encrypt integration
################################################################################
# letsencrypt['enable'] = nil
letsencrypt['contact_emails'] = ['sammy@digitalocean'] # This should be an array of email addresses to add as contacts
# letsencrypt['group'] = 'root'
# letsencrypt['key_size'] = 2048
# letsencrypt['owner'] = 'root'
# letsencrypt['wwwroot'] = '/var/opt/gitlab/nginx/www'
# See http://docs.gitlab.com/omnibus/settings/ssl.html#automatic-renewal for more on these settings
letsencrypt['auto_renew'] = true
letsencrypt['auto_renew_hour'] = "12"
letsencrypt['auto_renew_minute'] = "30"
letsencrypt['auto_renew_day_of_month'] = "*/7"
...
By changing the letsencrypt['auto_renew'] to false, you can also stop auto-renewal:
...
letsencrypt['auto_renew'] = false
...
You will not have to worry about service interruptions thanks to auto-renewals.
FAQs to Install GitLab on Ubuntu 20.04
Does GitLab have any system requirements for Ubuntu 20.04?
Yes, GitLab requires specific hardware resources like CPU, RAM, and storage. Refer to GitLab's official documentation for detailed system requirements.
Can I install GitLab on a cloud server running Ubuntu 20.04?
Absolutely! You can install GitLab on cloud servers like AWS or DigitalOcean running Ubuntu 20.04. Just ensure you meet the system requirements.
Does GitLab on Ubuntu 20.04 support HTTPS for secure connections?
Yes, GitLab supports HTTPS. We'll guide you on configuring SSL certificates to ensure secure communication with your GitLab instance.
Will my existing data be safe during the GitLab installation?
Yes, your existing data will be preserved. However, it's always wise to create backups before proceeding with any major installation.
How can I access the GitLab web interface after installation?
Once installed, you can access GitLab's web interface through your web browser using the server's IP or domain name.
Is it possible to integrate GitLab with third-party tools on Ubuntu 20.04?
Yes, GitLab supports integration with various tools like Jenkins, Jira, and Slack. You can configure these integrations in GitLab's settings.
Does GitLab provide a package for Ubuntu 22.04?
Yes, GitLab provides an official repository and package for Ubuntu. This makes it easier to install and update GitLab on Ubuntu 22.04.
Conclusion
You now have a fully functional GitLab instance on your own server. You can start importing or making new projects, and you can set the appropriate access level for a team. GitLab updates and adds new features to their platform frequently, so keep an eye on the project's home page to learn about any updates or significant announcements.
If you have any suggestions or queries, kindly leave them in the comments section.
