

Choose a different version or distribution
Introduction
Before we begin talking about how to secure Apache with Let's Encrypt on Ubuntu 22.04, let's briefly understand – What is Let's Encrypt?
Let's Encrypt is a free, automated, and open certificate authority (CA) that provides digital certificates for secure website encryption. It allows website owners to obtain trusted SSL/TLS certificates, ensuring data confidentiality and integrity.
Let's Encrypt simplifies the process by automating certificate issuance and renewal, making it accessible to everyone. Its user-friendly interface and widespread browser support have made it a popular choice for securing websites. With Let's Encrypt, you can protect your website and enhance its security easily and at no cost.
In this tutorial, we will show how to install a free Let’s Encrypt SSL certificate on Ubuntu 22.04, running Apache as a web server.
Advantages of Let's Encrypt
- Free: Let's Encrypt provides SSL/TLS certificates at no cost, making website encryption accessible to all.
- Automated: It automates the certificate issuance and renewal process, eliminating manual configuration and ensuring hassle-free security.
- Trusted: Let's Encrypt certificates are recognized and trusted by major browsers, ensuring a secure browsing experience for users.
- User-friendly: Its simple interface and easy setup make it accessible to users with varying technical expertise.
- Wide browser support: Let's Encrypt certificates are compatible with all popular web browsers, ensuring seamless encryption for a wide range of users.
Prerequisites to Secure Apache with Let's Encrypt on Ubuntu 22.04
Prior to moving on, make sure the following conditions are satisfied:
- Logged in as root or user with Sudo privileges.
- Your public server IP must be the pointer for the domain for which you want to receive the SSL certificate
example.comwill be used. - Installed Apache.
Install Certbot
To get the certificate, we'll use certbot. It's a command-line application that streamlines the procedures for getting and renewing Let's Encrypt SSL certificates.
The standard Ubuntu repositories include the certbot package. Use the following commands to install certbot and update the packages list:
sudo apt update
sudo apt install certbot
Generate Strong Dh (Diffie-Hellman) Group
A technique for securely transferring cryptographic keys across an unsafe communication channel is the Diffie-Hellman key exchange (DH). To improve security, create a fresh set of 2048-bit DH parameters:
sudo openssl dhparam -out /etc/ssl/certs/dhparam.pem 2048
You can modify the size up to 4096 bits, however, depending on the system entropy, the generating process might take longer than 30 minutes.
Obtaining a Let’s Encrypt SSL certificate
We're going to utilize the Webroot plugin to get an SSL certificate for the domain, which works by creating a temporary file in the ${webroot-path]/.well-known/acme-challenge directory to validate the requested domain. To confirm that the requested domain resolves to the server where certbot is hosted, the Let's Encrypt server sends HTTP queries to the temporary file.
We'll map all HTTP requests for .well-known/acme-challenge to a single location to simplify things /var/lib/letsencrypt.
To create the directory and enable writing access for the Apache server, run the following commands:
sudo mkdir -p /var/lib/letsencrypt/.well-known
sudo chgrp www-data /var/lib/letsencrypt
sudo chmod g+s /var/lib/letsencrypt
Create the following two configuration snippets to prevent duplicating code and improve configuration maintenance:
Alias /.well-known/acme-challenge/ "/var/lib/letsencrypt/.well-known/acme-challenge/"
<Directory "/var/lib/letsencrypt/">
    AllowOverride None
    Options MultiViews Indexes SymLinksIfOwnerMatch IncludesNoExec
    Require method GET POST OPTIONS
</Directory>
SSLProtocol             all -SSLv3 -TLSv1 -TLSv1.1
SSLCipherSuite          ECDHE-ECDSA-AES128-GCM-SHA256:ECDHE-RSA-AES128-GCM-SHA256:ECDHE-ECDSA-AES256-GCM-SHA384:ECDHE-RSA-AES256-GCM-SHA384:ECDHE-ECDSA-CHACHA20-POLY1305:ECDHE-RSA-CHACHA20-POLY1305:DHE-RSA-AES128-GCM-SHA256:DHE-RSA-AES256-GCM-SHA384
SSLHonorCipherOrder     off
SSLSessionTickets       off

SSLUseStapling On
SSLStaplingCache "shmcb:logs/ssl_stapling(32768)"

SSLOpenSSLConfCmd DHParameters "/etc/ssl/certs/dhparam.pem"

Header always set Strict-Transport-Security "max-age=63072000"
The code sample above uses chippers that Mozilla recommends, enables OCSP Stapling, HTTP Strict Transport Security (HSTS), and imposes a few HTTP headers that are security-focused.
Make sure that mod-ssl and mod_headers are both enabled before allowing the configuration files by executing:
sudo a2enmod ssl
sudo a2enmod headers
Afterward, activate the SSL configuration files by executing the following commands:
sudo a2enconf letsencrypt
sudo a2enconf ssl-params
Activate the HTTP/2 module to speed up and strengthen your websites:
sudo a2enmod http2
For modifications to take effect, reload the Apache configuration:
sudo systemctl reload apache2
Now that the Webroot plugin is installed, we can use the Certbot tool to get the SSL certificate files:
sudo certbot certonly --agree-tos --email [email protected] --webroot -w /var/lib/letsencrypt/ -d example.com -d www.example.com
If the SSL certificate is successfully acquired, the following message will be printed by certbot:
Output

IMPORTANT NOTES:
 - Congratulations! Your certificate and chain have been saved at:
   /etc/letsencrypt/live/example.com/fullchain.pem
   Your key file has been saved at:
   /etc/letsencrypt/live/example.com/privkey.pem
   Your cert will expire on 2020-10-06. To obtain a new or tweaked
   version of this certificate in the future, simply run certbot
   again. To non-interactively renew *all* of your certificates, run
   "certbot renew"
 - Your account credentials have been saved in your Certbot
   configuration directory at /etc/letsencrypt. You should make a
   secure backup of this folder now. This configuration directory will
   also contain certificates and private keys obtained by Certbot so
   making regular backups of this folder is ideal.
 - If you like Certbot, please consider supporting our work by:

   Donating to ISRG / Let's Encrypt:   https://letsencrypt.org/donate
   Donating to EFF:                    https://eff.org/donate-le
Once you have the certificate files, make the following changes to your domain virtual host configuration:
<VirtualHost *:80>
  ServerName example.com

  Redirect permanent / https://example.com/
</VirtualHost>

<VirtualHost *:443>
  ServerName example.com

  Protocols h2 http/1.1

  <If "%{HTTP_HOST} == 'www.example.com'">
    Redirect permanent / https://example.com/
  </If>

  DocumentRoot /var/www/example.com/public_html
  ErrorLog ${APACHE_LOG_DIR}/example.com-error.log
  CustomLog ${APACHE_LOG_DIR}/example.com-access.log combined

  SSLEngine On
  SSLCertificateFile /etc/letsencrypt/live/example.com/fullchain.pem
  SSLCertificateKeyFile /etc/letsencrypt/live/example.com/privkey.pem

  # Other Apache Configuration

</VirtualHost>
With the settings above, HTTPS is required, and the www version is redirected to the non-www version. Feel free to change the setup to suit your requirements.
For modifications to take effect, restart the Apache service:
sudo systemctl reload apache2
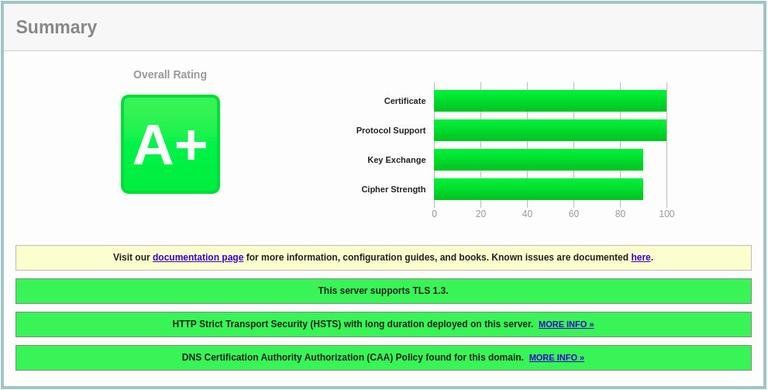
You may now access your website using https://, and a green lock symbol will appear.
You'll get an A+ score if you test your domain using the SSL Labs Server Test, as demonstrated below:
Auto-renewing Let’s Encrypt SSL certificate
The certificates from Let's Encrypt are good for 90 days. The certbot package builds a cronjob that runs twice daily and renews any certificate 30 days before expiry in order to automatically renew the certificates.
We must reload the Apache service as well when the certificate has been reissued. Add the following line to the /etc/cron.d/certbot file as a --renew-hook: "systemctl reload apache2"
0 */12 * * * root test -x /usr/bin/certbot -a \! -d /run/systemd/system && perl -e 'sleep int(rand(3600))' && certbot -q renew --renew-hook "systemctl reload apache2"
Using the certbot --dry-run switch, you may test the renewal procedure:
sudo certbot renew --dry-run
The renewal procedure was successful if there are no mistakes.
FAQs to Secure Apache with Let's Encrypt on Ubuntu 22.04
How do I obtain a Let's Encrypt certificate for Apache?
Run the command sudo certbot --apache and follow the prompts to generate and install the certificate.
Does Let's Encrypt provide automatic certificate renewal?
Yes, Let's Encrypt certificates can be automatically renewed using a cron job that runs the certbot renew command.
What if my Apache configuration changes after obtaining the certificate?
Let's Encrypt will handle the renewal process and update the certificate automatically when you run certbot renew.
Can I configure Let's Encrypt to redirect HTTP traffic to HTTPS?
Yes, Let's Encrypt can configure Apache to automatically redirect HTTP requests to HTTPS using a secure connection.
How can I verify if my Apache server is using a Let's Encrypt certificate?
Visit your website using HTTPS and check for the padlock symbol in the browser's address bar.
Can I use Let's Encrypt certificates for multiple domains on Apache?
Yes, you can secure multiple domains by specifying them with the -d flag when running the certbot --apache command.
Conclusion
This tutorial covered how to use Ubuntu 22.04's Let's Encrypt client certbot to get SSL certificates for your domains. Additionally, we have shown how to set up a cron job for automatic certificate renewal and configure Apache to utilize the certificates.
If you have any queries, please leave a comment below and we’ll be happy to respond to them.