
Choose a different version or distribution
Introduction
Before we begin talking about how to install Gitea on Ubuntu 20.04, let's briefly understand – What is Gitea?
Gitea is a lightweight, open-source Git service that simplifies code collaboration and version control. It offers a user-friendly interface, making it easy for developers to manage their repositories, track changes, and collaborate on projects. Gitea provides essential features like pull requests, issue tracking, and code reviews.
With its self-hosted nature, it gives users full control over their codebase while ensuring data privacy and security. Whether you're an individual developer or part of a team, Gitea is a powerful tool for efficient and seamless code management.
In this tutorial, we will explain the steps for setting up Gitea on Ubuntu 20.04.
Advantages of Gitea
- Lightweight and User-friendly: Gitea is a lightweight and user-friendly Git service that simplifies code collaboration and version control.
- Self-hosted: Gitea allows users to have full control over their codebase by providing a self-hosted solution.
- Enhanced Collaboration: With features like pull requests, issue tracking, and code reviews, Gitea promotes efficient and seamless collaboration among developers.
- Data Privacy and Security: Gitea ensures data privacy and security, making it a reliable choice for managing sensitive code repositories.
- Extensive Features: Gitea offers essential features like repository management, code tracking, and collaboration tools, making it a powerful tool for developers and teams.
Prerequisites to Install Gitea on Ubuntu 20.04
Among other database management systems, Gitea is compatible with SQLite, PostgreSQL, and MySQL/MariaDB.
Only use SQLite if you have a very tiny database. It is recommended that MySQL or PostgreSQL be used for more extensive deployments.
Gitea's backend database will be SQLite. If SQLite isn't already present on your Ubuntu machine, you may install it by typing the appropriate instructions as the sudo user, as shown below.
sudo apt update
sudo apt install sqlite3
Installing Gitea
Gitea may be installed from source, as a binary, or as a package and offers Docker images. Gitea will be installed from binaries.
Install Git
Installing Git on your server is the first step.
sudo apt update
sudo apt install git
Showing the Git version will confirm the installation:
git --version
Output

git version 2.25.1
Create a Git user
Type the following to create a new system user that will execute the Gitea application:
sudo adduser \
   --system \
   --shell /bin/bash \
   --gecos 'Git Version Control' \
   --group \
   --disabled-password \
   --home /home/git \
   git
The aforementioned command makes the home directory /home/git and establishes a new user and group called git. The result will resemble the following:
Output

Adding system user `git' (UID 112) ...
Adding new group `git' (GID 118) ...
Adding new user `git' (UID 112) with group `git' ...
Creating home directory `/home/git' ...
Download Gitea binary
Visit the Gitea Download page and get the most recent binaries for your system. At this moment, version 1.10.2 is the most up-to-date available. In the command below, replace VERSION with the new version number if one is available.
To get the Gitea binary from the /tmp directory, use wget:
VERSION=1.14.1
sudo wget -O /tmp/gitea https://dl.gitea.io/gitea/${VERSION}/gitea-${VERSION}-linux-amd64
The gitea binaries may be executed from anywhere. It is customary to place binaries in the /usr/local/bin directory, therefore we will do so now:
sudo mv /tmp/gitea /usr/local/bin
Make the binary executable:
sudo chmod +x /usr/local/bin/gitea
Run the following commands to create the folders and establish the necessary ownership and permissions:
sudo mkdir -p /var/lib/gitea/{custom,data,log}
sudo chown -R git:git /var/lib/gitea/
sudo chmod -R 750 /var/lib/gitea/
sudo mkdir /etc/gitea
sudo chown root:git /etc/gitea
sudo chmod 770 /etc/gitea
According to the canonical Gitea docs, the aforementioned directory layout is the preferred one.
To facilitate the generation of the configuration file by the installation wizard, the permissions of the /etc/gitea directory are changed to 770. We will implement stricter permissions when the installation is finished.
Create a Systemd Unit File
Gitea will be executed as a systemd service.
By entering the following command, you may download an example systemd unit file to the /etc/systemd/system directory.
sudo wget https://raw.githubusercontent.com/go-gitea/gitea/main/contrib/systemd/gitea.service -P /etc/systemd/system/
The file is already set up to work with our system, so you don't need to alter it.
Turn on and launch the Gitea service:
sudo systemctl daemon-reload
sudo systemctl enable --now gitea
Verify that Gitea is running:
sudo systemctl status gitea
Output

gitea.service - Gitea (Git with a cup of tea)
     Loaded: loaded (/etc/systemd/system/gitea.service; enabled; vendor preset: enabled)
     Active: active (running) since Thu 2021-05-06 05:32:04 UTC; 7s ago
   Main PID: 77781 (gitea)
      Tasks: 6 (limit: 470)
     Memory: 130.6M
     CGroup: /system.slice/gitea.service
             └─77781 /usr/local/bin/gitea web --config /etc/gitea/app.ini
Configure Gitea
Now that Gitea has been installed and launched, the web interface may be used to complete the setup process.
Gitea is configured to accept connections on the port 3000 by default.
The Gitea port must be opened in the UFW firewall if it is installed on the server. Just type in this command to open up communication over port 3000:
sudo ufw allow 3000/tcp
When you open your browser and enter http://YOUR_DOMAIN_IR_IP:3000, the following display will appear:
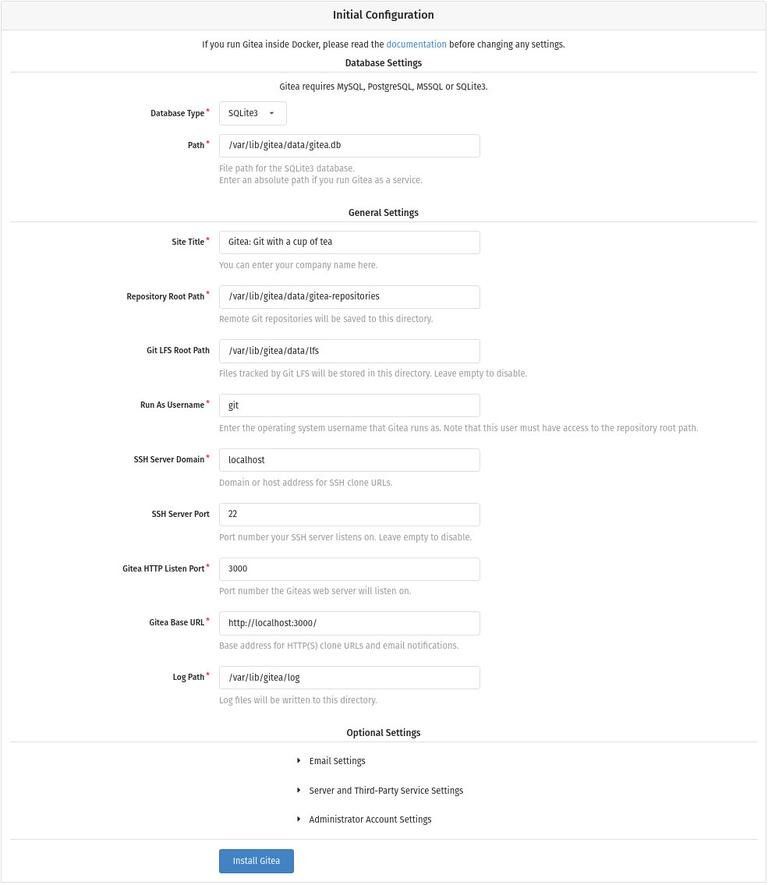
Database Settings:
- Database Type: SQLite3
- Path: Use an absolute path,
/var/lib/gitea/data/gitea.db
Application General Settings:
- Database Type: SQLite3
- Path: Use an absolute path,
/var/lib/gitea/data/gitea.db - Site Title: Enter your organization name.
- Repository Root Path: Leave the default
var/lib/gitea/data/gitea-repositories. - Git LFS Root Path: Go with the default
/var/lib/gitea/data/lfs. - Run As Username: git
- SSH Server Domain: Enter your server IP address or domain.
- SSH Port: 22, change it if SSH is listening on other Port.
- Gitea HTTP Listen Port: 3000
- Gitea Base URL: Use HTTP and your domain or server IP address.
- Log Path: Leave the default
/var/lib/gitea/log
Click the "Install Gitea" button to begin the installation.
The setup process takes no time at all. When you're done, you'll be sent to the login screen.
A "Need an account? Register today" link is provided. The first signup will be assigned to the Admin group by default.
The Gitea configuration file should be made read-only by setting the permissions as follows.
sudo chmod 750 /etc/gitea
sudo chmod 640 /etc/gitea/app.ini
All done. Your Ubuntu computer already has Gitea installed.
Configuring Nginx as SSL Termination Proxy
This is a suggested extra step, but not required. Gitea may be accessed securely via HTTPS thanks to Nginx's role as an SSL termination proxy between the application and web clients.
Having a domain or subdomain corresponding to your server's public IP is required when using Nginx as a reverse proxy. We'll use git.example.com as our example server.
First, follow the instructions below to set up Nginx and create a free Let's Encrypt SSL certificate.
Once finished, edit the domain server block file in your text editor:
sudo nano /etc/nginx/sites-enabled/git.example.com
server {
    listen 80;
    server_name git.example.com;

    include snippets/letsencrypt.conf;
    return 301 https://git.example.com$request_uri;
}

server {
    listen 443 ssl http2;
    server_name git.example.com;

    proxy_read_timeout 720s;
    proxy_connect_timeout 720s;
    proxy_send_timeout 720s;

    client_max_body_size 50m;

    # Proxy headers
    proxy_set_header X-Forwarded-Host $host;
    proxy_set_header X-Forwarded-For $proxy_add_x_forwarded_for;
    proxy_set_header X-Forwarded-Proto $scheme;
    proxy_set_header X-Real-IP $remote_addr;

    # SSL parameters
    ssl_certificate /etc/letsencrypt/live/git.example.com/fullchain.pem;
    ssl_certificate_key /etc/letsencrypt/live/git.example.com/privkey.pem;
    ssl_trusted_certificate /etc/letsencrypt/live/git.example.com/chain.pem;
    include snippets/letsencrypt.conf;
    include snippets/ssl.conf;

    # log files
    access_log /var/log/nginx/git.example.com.access.log;
    error_log /var/log/nginx/git.example.com.error.log;

    # Handle / requests
    location / {
       proxy_redirect off;
       proxy_pass http://127.0.0.1:3000;
    }
}
Remember to change git.example.com to your own Gitea domain and point to where your SSL certificate files are stored. Every bit of HTTP traffic is now being routed to HTTPS.
To apply the new settings, restart the Nginx service.
sudo systemctl restart nginx
After that, modify the Gitea domain and root URL. To achieve this, enter the configuration file and change the lines shown below:
sudo nano /etc/gitea/app.ini
[server]
DOMAIN           = git.example.com
ROOT_URL         = https://git.example.com/
Restart the Gitea service by typing:
sudo systemctl restart gitea
You may now access the Gitea proxy at https://git.example.com since it has been set up.
Configuring Email Notifications
Whether you set up Postfix or use a transactional mail provider like SendGrid, MailChimp, MailGun, or SES, your Gitea instance will be able to send out emails for notifications.
Edit the settings file as follows to enable email notifications:
sudo nano /etc/gitea/app.ini
[mailer]
ENABLED = true
HOST    = SMTP_SERVER:SMTP_PORT
FROM    = SENDER_EMAIL
USER    = SMTP_USER
PASSWD  = YOUR_SMTP_PASSWORD
Make sure that the SMTP server information is entered correctly.
For modifications to take effect, restart the Gitea service:
sudo systemctl restart gitea
You may log into Gitea and check your settings for the SMTP mailer and send a test message by going to Site Administration > Configuration > SMTP Mailer Configuration.
By setting up a web webhook, you may integrate Gitea with Slack and have alerts sent there.
Upgrading Gitea
Simply download and replace the binary to update to the most recent Gitea version.
Stop the Gitea service:
sudo systemctl stop gitea
Move the most recent Gitea version to the /usr/local/bin directory after downloading it:
VERSION=<THE_LATEST_GITEA_VERSION>
wget -O /tmp/gitea https://dl.gitea.io/gitea/${VERSION}/gitea-${VERSION}-linux-amd64
sudo mv /tmp/gitea /usr/local/bin
Make the binary executable:
sudo chmod +x /usr/local/bin/gitea
Restart the Gitea service:
sudo systemctl restart gitea
That’s it.
FAQs to Install Gitea on Ubuntu 20.04
Are there any specific system requirements for installing Gitea on Ubuntu 20.04?
Yes, Gitea has specific system requirements. Ensure that your Ubuntu 20.04 system meets those requirements before installation.
Is Gitea free to use?
Yes, Gitea is an open-source project and is free to use.
Can I customize the installation of Gitea on Ubuntu 20.04?
Yes, Gitea provides customization options during the installation process, allowing you to configure various settings based on your requirements.
Does Gitea offer user authentication and access control?
Yes, Gitea provides user authentication and access control mechanisms to ensure secure code management.
Can I integrate Gitea with other tools and services?
Yes, Gitea supports integrations with various tools and services, such as issue trackers and continuous integration systems.
How can I update Gitea on Ubuntu 20.04?
Gitea provides an update mechanism that can be used to update the Gitea installation on Ubuntu 20.04. Refer to the documentation for detailed instructions.
Conclusion
The purpose of this tutorial was to help you set up Gitea on Ubuntu 20.04. You can find detailed instructions on setting up your Gitea instance and making your first project on the Gitea documentation page.
If you have any queries, please leave a comment below and we’ll be happy to respond to them.