
Choose a different version or distribution
Introduction
Before we begin talking about how to install Rainloop on Ubuntu 18.04, let’s briefly understand - What is Rainloop?
Rainloop is a lightweight and user-friendly webmail client that allows you to access your emails conveniently from any device. It offers a seamless experience with its modern interface and advanced features.
With Rainloop, you can manage multiple email accounts, compose and send messages, organize your inbox, and even sync your contacts and calendars. It's an efficient solution for individuals and businesses looking for an easy-to-use webmail client.
In this tutorial, you will install Rainloop Webmail on Ubuntu 18.04. We will also answer some FAQs relating to the Rainloop installation.
Advantages of Rainloop Webmail
- User-friendly interface: Rainloop provides a modern and intuitive interface, making it easy for users to navigate and manage their emails effectively.
- Multi-account support: It allows users to manage multiple email accounts from different providers, saving time and effort.
- Mobile accessibility: Rainloop is fully responsive, enabling seamless access to emails from any device, including smartphones and tablets.
- Advanced features: It offers features like drag-and-drop functionality, email filtering, and auto-complete, enhancing productivity and organization.
- Integration capabilities: Rainloop supports integration with various services, such as calendars and contacts, for a comprehensive email management experience.
Prerequisites to Install Rainloop Webmail on Ubuntu 18.04
1) A server running on the Ubuntu 18.04.
2) Also, a static IP address 192.168.0.102, properly set-up in your server.
3) A non-root user with the sudo privileges.
Step 1 - Updating the System
1) First, you will update your system with the latest version. Do this by running the following command:
sudo apt-get update -y
sudo apt-get upgrade -y
2) After updating the system, restart the system to apply the changes.
Step 2 - Installing the Apache, MariaDB, and PHP
1) The Rainloop runs on a web-server. Moreover, it uses MariaDB to store the data and writes in the PHP language. So, you will install Apache web-server, MariaDB server, PHP and other PHP modules to the system. You will install all of them by running the following command:
sudo apt-get install apache2 mariadb-server curl php7.2 php7.2-mysql php7.2-curl php7.2-json php7.2-cgi libapache2-mod-php7.2 php7.2-xmlrpc php7.2-gd php7.2-mbstring php7.2 php7.2-common php7.2-xmlrpc php7.2-soap php7.2-xml php7.2-intl php7.2-cli php7.2-ldap php7.2-zip php7.2-readline php7.2-imap php7.2-tidy php7.2-recode php7.2-intl php7.2-sqlite3 -y
2) After installing packages, start Apache web-server. It also enable it to start on boot-time. Do it using the following commands:
sudo systemctl start apache2
sudo systemctl enable apache2
sudo systemctl start mariadb
sudo systemctl enable mariadb
3) You will now check the status of MariaDB service. Do it with the following command:
sudo systemctl status mariadb
4) You will see the following output:
Output

? mariadb.service - MariaDB 10.1.34 database server
   Loaded: loaded (/lib/systemd/system/mariadb.service; enabled; vendor preset: enabled)
   Active: active (running) since Wed 2020-09-16 15:06:51 UTC; 23h ago
     Docs: man:mysqld(8)
           https://mariadb.com/kb/en/library/systemd/
 Main PID: 1097 (mysqld)
   Status: "Taking your SQL requests now..."
    Tasks: 27 (limit: 1114)
   CGroup: /system.slice/mariadb.service
           ??1097 /usr/sbin/mysqld

September 16 15:06:30 ubuntu1804 systemd[1]: Starting MariaDB 10.1.34 database server...
September 16 15:06:39 ubuntu1804 mysqld[1097]: 2020-09-16 15:06:39 139929447279744 [Note] /usr/sbin/mysqld (mysqld 10.1.34-MariaDB-0ubuntu0.18.04.1)
September 16 15:06:51 ubuntu1804 /etc/mysql/debian-start[1320]: Upgrading MySQL tables if necessary.
September 16 15:06:51 ubuntu1804 systemd[1]: Started MariaDB 10.1.34 database server.
September 16 15:06:52 ubuntu1804 /etc/mysql/debian-start[1324]: /usr/bin/mysql_upgrade: the '--basedir' option is always ignored
September 16 15:06:52 ubuntu1804 /etc/mysql/debian-start[1324]: Looking for 'mysql' as: /usr/bin/mysql
September 16 15:06:52 ubuntu1804 /etc/mysql/debian-start[1324]: Looking for 'mysqlcheck' as: /usr/bin/mysqlcheck
September 16 15:06:52 ubuntu1804 /etc/mysql/debian-start[1324]: This installation of MySQL is already upgraded to 10.1.34-MariaDB, use --force if you
September 16 15:06:52 ubuntu1804 /etc/mysql/debian-start[1356]: Checking for insecure root accounts.
September 16 15:06:52 ubuntu1804 /etc/mysql/debian-start[1360]: Triggering myisam-recover for all MyISAM tables and aria-recover for all Aria tables
Step 3 - Install Rainloop
1) First, create a directory for Rainloop in the Apache web-root. Next, install the latest version of the Rainloop with following command:
sudo mkdir /var/www/html/rainloop
cd /var/www/html/rainloop
sudo curl -s https://repository.rainloop.net/installer.php | sudo php
You will get the below output:
!/usr/bin/env php


       [RainLoop Webmail Installer]


 * Connecting to repository ...
 * Downloading package ...
 * Complete downloading!
 * Installing package ...
 * Complete installing!

 * [Success] Installation is finished!
2) Once the installation completes, give proper permissions to the Rainloop directory, using the below command:
sudo chown -R www-data:www-data /var/www/html/rainloop/
sudo chmod -R 755 /var/www/html/rainloop
Step 4 - Configuring Apache for the Rainloop
1) After that, you will create an Apache virtual host-file for Rainloop. You will do this with the following command:
sudo nano /etc/apache2/sites-available/rainloop.conf
2) Then, add the following lines:
<VirtualHost *:80>
     ServerAdmin [email protected]
     DocumentRoot /var/www/html/rainloop/
     ServerName example.com
     ServerAlias www.example.com

     <Directory /var/www/html/rainloop/>
    Options +Indexes +FollowSymLinks +ExecCGI
    AllowOverride All
    Order deny,allow
    Allow from all
    Require all granted

     </Directory>

     ErrorLog ${APACHE_LOG_DIR}/error.log
     CustomLog ${APACHE_LOG_DIR}/access.log combined

</VirtualHost>
3) Then, replace example.com in the above vhost file with your own domain-name. You will save and close the file, after finishing. Further, disable default virtual-host file. Enable the Rainloop virtual-host file with the following command:
sudo a2dissite 000-default.conf
You will then see the following output:
Site 000-default disabled.
To activate the new configuration, you need to run
systemctl reload apache2
4) After that, enable the Rainloop virtual-host file. Do it with the following command:
sudo a2ensite rainloop.conf
You will see the below output:
Enabling site rainloop.
To activate the new configuration, you need to run:
systemctl reload apache2
5) Next, you will enable the Apache rewrite module. Do it with the below command:
sudo a2enmod rewrite
You will then see the below output:
Enabling module rewrite.
To activate the new configuration, you need to run:
  systemctl restart apache2
5) Finally, you will need to restart Apache service with command:
sudo systemctl restart apache2
Step 5 - Accessing the Rainloop
1) After installation of the Rainloop, access the Rainloop web interface. Next, open your web browser and type in the URL http://192.168.0.102/?admin. Also, replace the IP address in the URL with the IP of your server. You will get redirected to the following page:
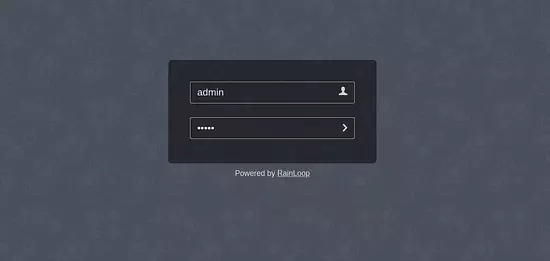
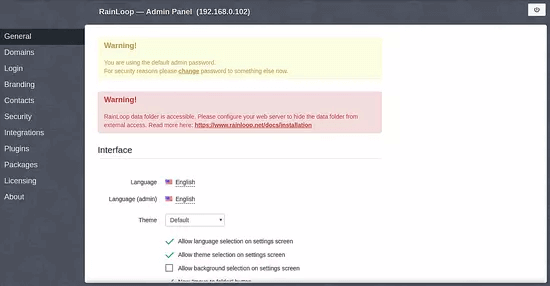
2) Now, give the default username as admin and the password as 12345. Next, click on the > button. You will see the Rainloop dashboard as below:
FAQs to Install the Rainloop Webmail on Ubuntu 18.04
What are the system requirements for installing Rainloop on Ubuntu 18.04?
To install Rainloop, you need a server running Ubuntu 18.04, a web server (Apache or Nginx), PHP 5.6 or higher, and some PHP extensions like mbstring and zip.
Can I install Rainloop alongside other web applications on my Ubuntu server?
Yes, Rainloop can coexist with other web applications on the same server, as long as you configure your web server to handle the requests correctly.
Is there a graphical installer available for Rainloop on Ubuntu 18.04?
No, Rainloop doesn't have a graphical installer. You need to follow the manual installation process, which involves configuring the web server and copying files.
Can I use Rainloop with my existing email accounts?
Yes, you can use Rainloop with your existing email accounts from different providers. Simply configure Rainloop with the IMAP and SMTP settings of your email accounts.
Does Rainloop support SSL encryption for secure connections?
Yes, Rainloop supports SSL encryption. It's recommended to enable SSL on your web server to ensure secure communication between Rainloop and your browser.
How do I access Rainloop Webmail after installation?
You can access Rainloop Webmail by entering your server's IP address or domain name in a web browser. For example, http://your_server_ip/rainloop.
Can RainLoop Webmail be used in conjunction with other email clients?
Yes, RainLoop Webmail can be used alongside other email clients. You can access your emails through RainLoop Webmail while also using desktop email clients like Outlook or Thunderbird. The synchronization option allows changes made in RainLoop Webmail (such as read/unread status or folder organization) to appear in other email clients and vice versa.
Conclusion
We hope this detailed tutorial helped you install the Rainloop Webmail on Ubuntu 18.04. To learn more about Rainloop installation on Ubuntu 18.04 server, check out the official Rainloop documentation.
If you have any queries, please leave a comment below, and we’ll be happy to respond to them for sure.